
Free Shipping in the USA on nearly all items!
Limited phone hours during the Holidays! Call us: 888-611-9305
Free Shipping in the USA on nearly ALL items! Limited phone hours during the Holidays!

Most photoperiod cannabis plants finish flowering in 7 to 11 weeks after you switch the light schedule, with indicas often wrapping up closer to seven and sativa-leaning varieties stretching past ten. Autoflowers skip the light-switch step entirely and run on their own internal clock, usually finishing 9 to 11 weeks after the seed cracks. The single biggest mistake growers make right after triggering flower is doing too much, too fast. Here’s what actually needs your attention in week one.
Before you touch anything else, run through this:
The flowering stage runs 7 to 11 weeks for most photoperiod strains and finishes on trichome color, not a fixed calendar date, so track visual maturity alongside your week count.
| Point | Details |
|---|---|
| Flip at the right size | Trigger 12/12 once plants reach 50–60% of target final height to account for stretch. |
| Match environment to phase | Run higher RH early flower, tapering below 50% by weeks 6 through 8 to prevent bud rot. |
| Prioritize weeks 4 to 6 | Feed and support plants closely here, since this window builds most of the final bud mass. |
| Harvest by trichomes | Check multiple colas with a loupe and target mostly milky with some amber, not a specific week. |
| Fill the lower canopy | Products like LedGrowLightsDepot’s under-canopy LED fixtures help light reach lower bud sites that standard overhead setups miss. |
The flowering stage is the reproductive phase where a cannabis plant stops prioritizing leaf and stem growth and redirects its energy into producing flowers, the parts growers harvest and cure. It runs on a biological trigger tied to darkness, and it unfolds in four distinct sub-phases rather than one long, uniform push.
Those sub-phases generally break down as transition and stretch in weeks 1 to 3, bud formation and filling in weeks 4 to 6, and ripening or maturation from week 7 onward. Each phase asks for different things from you as a grower. Nutrient needs, humidity tolerance, and even how much you should be touching the plant all shift as it moves through these windows.
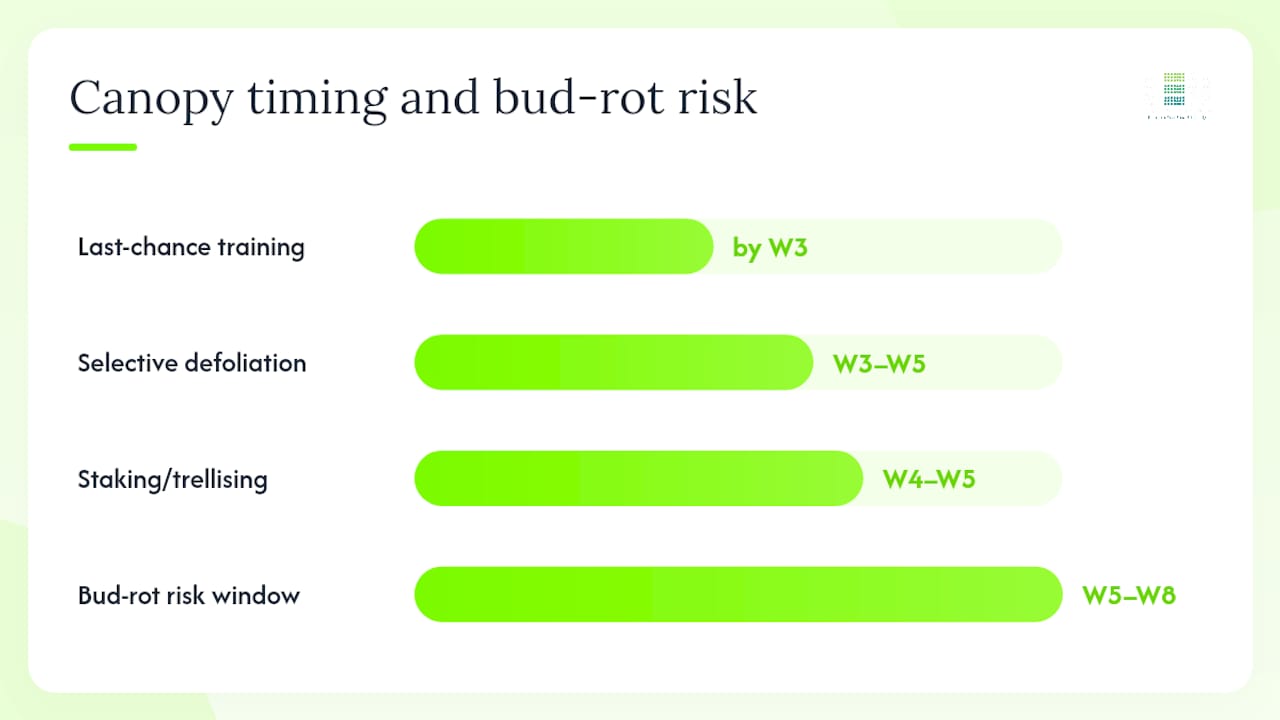
The stretch phase is also the last realistic window to shape your canopy. Once buds start stacking in earnest, high-stress training or supercropping risks snapping branches loaded with developing flowers instead of gently reshaping the plant.
The reason an uninterrupted dark period matters so much comes down to a plant hormone-signaling process called phytochrome conversion. Cannabis reads darkness duration to decide whether it’s in a short-day cycle worth flowering into. Interrupt that dark period with light and you reset the internal clock, which is why photoperiod plants demand a genuinely dark room. Autoflowers don’t play this game at all. They shift into flower on an internal timer, typically around week 3 or 4 from germination, regardless of your light schedule.
The remaining growth happens during the stretch, so flipping too late means an overgrown plant fighting your tent ceiling, and flipping too early sacrifices yield potential you haven’t built yet.
Autoflowers don’t need a flip at all. Most growers run them on 18/6 or even 20/4 for their entire lives, since flowering triggers automatically around week 3 to 4 regardless of the light schedule you use. That’s one of the most misunderstood parts of the weed flowering stage for beginners moving from photoperiod genetics: there’s no switch to throw, no calendar decision to sweat over. The plant handles it.
For photoperiod strains, the 12/12 dark period has to be genuinely dark, not “dim.” A single stray light source during the night cycle, a hallway light under a door, an LED indicator on nearby equipment, can delay flowering or trigger hermaphroditism (male flowers on a female plant) in sensitive genetics. This is the most common and most preventable flowering-stage failure home growers run into.
Run through this before you commit to the flip:
Pro Tip: Photograph your plants from the same angle right before you flip. It gives you a real baseline to measure stretch against instead of guessing whether that cola grew four inches or eight.
A typical 8 to 9 week photoperiod flower moves through recognizable visual and physiological checkpoints. Sativa-dominant strains and some long-flowering landrace genetics will run past this timeline by two to four weeks, so treat these ranges as a baseline, not a hard deadline.
Weekly, glance-check this list regardless of which week you’re in:
By weeks 4 through 6, plants commonly add 40 to 60% of their final bud mass, which is exactly why environment and feeding mistakes in this window are the hardest to recover from. A missed feeding at week 2 is forgivable. A humidity spike at week 5, sitting inside a dense, swelling cola, can cost you the whole top third of a plant to rot before you notice.
Visually, watch for calyxes stacking tight against each other by week 5 rather than sitting loose and separated. Trichome coverage should start looking frosted to the naked eye by week 6 on most colas, though you’ll want a loupe to confirm ripeness later. If you’re running a sativa-dominant phenotype, don’t panic when week 9 arrives and the plant still looks like it’s in peak bloom rather than ripening. That’s normal for genetics rated for 10 to 13 weeks.
Pro Tip: Keep a simple grow journal with one line per week: EC, RH, temp, and one observation. When something goes wrong in week 7, you’ll want to know exactly what changed back in week 4.
Flowering nutrition means dialing nitrogen down and phosphorus and potassium up as the plant shifts from leaf production to bud development. A workable progression looks like this across five phases, with EC (electrical conductivity, a proxy for total dissolved nutrient salts) ramping and then tapering.
This kind of phased NPK approach works because the plant’s demand for phosphorus and potassium genuinely spikes during bud formation, while nitrogen needs drop off as vegetative growth halts. Feeding vegetative-strength nitrogen through peak bloom is one of the more common ways growers end up with dark green, nutrient-burnt leaves wrapped around otherwise healthy buds.
Start conservatively.
A few additives earn their place in a flowering feed schedule:
If runoff EC reads significantly higher than your input feed EC, salts are building up in the medium and you need a plain-water flush before your next feeding. If it reads lower, the plant is hungry and pulling nutrients faster than you’re supplying them.
Pro Tip: Test your water source’s baseline EC before you calculate any feed ratio. Well water and heavily treated tap water can already carry an EC of 0.3 to 0.5, which throws off every ratio downstream if you don’t account for it.
Environment control during flowering is really about managing one core risk: humidity trapped inside dense, swelling colas that invites bud rot. That risk climbs specifically during weeks 5 through 8, when buds are thick enough to hold moisture but not yet dry enough to resist mold.
Growers who keep late-flower RH below roughly 50% cut their bud rot risk substantially, since Botrytis thrives in the still, humid microclimate inside a tight cola.
Canopy management during this window has a narrow timing window of its own:
A subtler environmental lever is negative DIF, meaning running your daytime temperature slightly cooler than nighttime, which some growers use to help control excessive internode stretch. Keeping lights at the manufacturer-recommended distance also matters here: too close and heat stress mimics nutrient problems, too far and you lose intensity at the lower canopy where it’s needed most for even bud set. Under-canopy supplemental lighting addresses that lower-canopy gap directly, which we’ll get into in the lighting section below.
For monitoring, a combination RH/temperature datalogger placed at canopy height, checked at minimum once daily during weeks 5 through 8, catches problems before they become visible damage. A dedicated PPFD meter lets you confirm your fixture is actually delivering the intensity you think it is, since output degrades over a bulb’s or diode’s lifespan.
Bud rot, foxtailing, hermaphroditism, and nutrient lockout account for the overwhelming majority of flowering-stage crop losses. Catching each one early is the difference between losing a few colas and losing the plant.
A cheap moisture meter inserted near dense colas can flag trapped humidity before it becomes visible mold.
Pro Tip: Keep a pair of dedicated, sterilized scissors just for removing problem material. Cross-contaminating healthy tissue with scissors that just cut moldy bud is how one rot spot becomes five.
Trichome color, not the calendar, tells you when to harvest. Aim for mostly milky white trichomes with some amber rather than counting down to a specific week number, since strain genetics and even environmental conditions shift actual finish time by a week or more in either direction.
Pistil color gives you a secondary, lower-resolution signal. Pistils shifting from white to orange or brown and curling inward suggest the plant is approaching maturity, but pistils alone aren’t precise enough to time harvest on their own. Trichomes are the real metric because they directly reflect cannabinoid and terpene development.
These are starting points, not universal rules, since resin production and color shift speed vary noticeably between strains.
Calendar weeks remain useful for planning your grow room schedule and predicting roughly when to start checking. They’re a guide, not the deciding factor. The trichomes make the final call.
Pro Tip: Check trichomes in natural or full-spectrum white light, never under colored grow light. Purple or red-heavy spectrums distort how clear, milky, and amber actually look under a loupe.
Flushing means running plain, pH-adjusted water through your medium for the final one to two weeks before harvest to clear excess nutrient salts that can affect flavor and burn quality. Soil growers typically need less aggressive flushing than hydro growers, since soil buffers nutrients more gradually. If your runoff EC already reads low and leaves are yellowing normally, you may not need a full two-week flush at all.
On harvest day, work with clean, sharp, sterilized scissors and handle colas by the stem, not the buds themselves, to avoid knocking off trichomes with your fingers. Wash your hands and avoid touching buds more than necessary throughout the process. Some fan leaf yellowing and drop in these final weeks is completely normal as the plant remobilizes nitrogen out of aging leaves toward the ripening buds, so don’t mistake it for a problem to fix.
Most flower takes 7 to 14 days to dry properly, judged by when small stems snap rather than bend.
Curing follows drying: move buds into airtight glass jars filled about two thirds full, then burp them (open the lid for several minutes) once or twice daily for the first week, tapering to a few times a week over the following two to four weeks.
Wet-trimming (trimming immediately after cutting, before drying) tends to speed up drying time and can make trimming easier since leaves haven’t curled yet. Dry-trimming (trimming after the full dry) is generally considered better for terpene retention since it slows moisture loss and reduces the surface area exposed during the most volatile drying days.
Pro Tip: Trim over a screen or tray and save your kief and trim. Even a modest harvest generates trim worth extracting later.
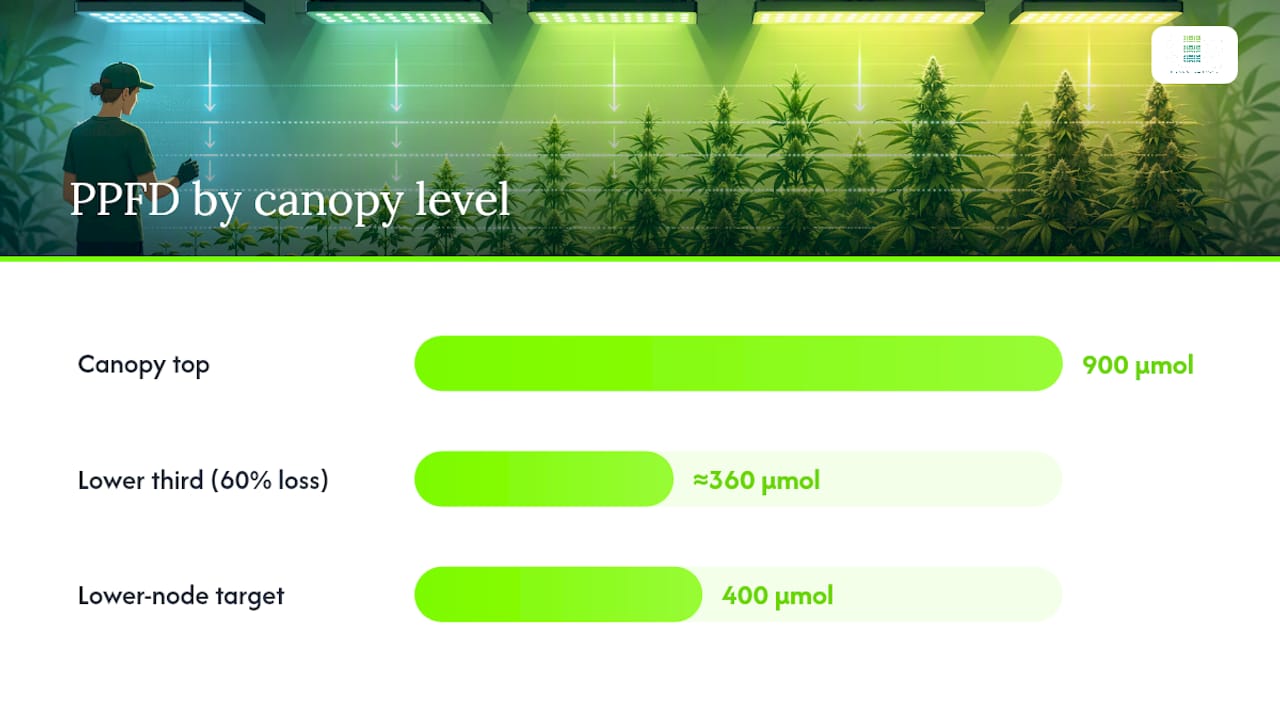
Upper-canopy PPFD gets most of the attention in grow guides, but it’s not the whole story. A fixture delivering 700 to 1,100 µmol/m²/s at the top of your canopy tells you nothing about what’s reaching the lower third of the plant, where shading from upper fan leaves and colas routinely cuts light intensity by 60% or more. That gap is exactly why lower buds finish airy and underdeveloped while top colas look great.
Lower-node PPFD targets generally run lower than canopy-top numbers, roughly 300 to 500 µmol/m²/s is a reasonable floor to aim for at mid-plant during peak bloom. Getting there usually means adding a second light source rather than just cranking your main fixture higher, since overdriving a single overhead light to compensate for lower-canopy shade just adds more heat stress up top without solving the shading problem underneath.
| Fixture Type | Typical Placement | Best Use Case |
|---|---|---|
| ThinkGrow LED Model-I | Under-canopy or supplemental side mount | Small to medium tents needing lower-node fill |
| ThinkGrow LED Model-I Plus | Under-canopy, larger tents or racks | Expanded coverage for bigger canopies |
| Grower’s Choice ROI-E720 | Primary overhead fixture | Full-canopy PPFD for peak flowering demand |
| Grower’s Choice ROI-E420 | Primary fixture, smaller footprint | Growers scaling from hobby to small commercial |
| Grower’s Choice ROI-FF 650W 4x4 | Primary fixture for 4x4 flowering | Commercial-style flowering rooms needing high PPFD |
| Sunblaster Micro LED (White) | Tight under-canopy gaps, shelving | Hobbyist supplemental setups in cramped spaces |
| Sunblaster Micro LED (Black) | Same as above, alternate finish | Same as above |
Add under-canopy lighting starting around mid-flower through peak bloom, roughly weeks 3 through 6, once the canopy has enough structure to create real shading but before lower bud sites have already locked in an airy, underdeveloped shape. Mount fixtures horizontally between plants or along tent walls rather than pointed straight up, which avoids scorching stems and keeps heat from building up in a space that already runs warm.
Heat management matters more with under-canopy lights than with your primary fixture, since they sit closer to the plant and often lack the ambient airflow overhead lights get. Keep a small clip fan circulating air around any under-canopy fixture and check leaf surface temperature near it periodically with an infrared thermometer.
The logic behind under-canopy and proximity lighting comes down to filling gaps standard overhead setups can’t reach. Growers pairing supplemental under-canopy fixtures with solid canopy management report more even bud development across the entire plant, not just the top third that always gets the light anyway.
The biggest flowering-stage mistake isn’t a single dramatic failure. It’s letting small environmental drift go unchecked for too many days in a row. A grower checks temperature and humidity religiously in week 1, gets comfortable by week 4, and stops looking closely right when the plant needs the most attention. That’s exactly backwards, and it’s the single corrective habit I’d tell any grower to build: your inspection routine should get more rigorous as flower progresses, not less.
Late flower is where I’ve watched more crops get quietly ruined than anywhere else in the cycle, almost always from bud rot nobody caught until it had spread. My habit now is simple: every single day during weeks 6 through harvest, I physically part the lower colas on every plant and look inside with a flashlight, not just glance at the outside. Combine that with keeping RH tight in that final stretch and you catch problems while they’re still a single bud you can cut out, not a branch you have to sacrifice.
Airy lower buds and inconsistent grading almost always trace back to one thing: light that never reaches the bottom third of the canopy. Filling that gap with the right supplemental fixture is one of the more direct ways to improve bud density without changing anything about your feed schedule or genetics.

If you’re running a smaller tent, the ThinkGrow LED Model-I fits neatly into under-canopy or side-mount positions without adding much heat load. Growers with bigger canopies or commercial-style setups often pair a primary fixture like the Grower’s Choice ROI-FF 650W with supplemental under-canopy lighting to hit peak-bloom PPFD across the entire plant, not just the top. These are products sold directly through LedGrowLightsDepot, built around proprietary proximity systems designed specifically for this lower-canopy gap. Check the spec sheets on either page to see which fits your current tent footprint.
Consult these directly for photo references and more detailed regional growing protocols, since climate and genetics both shift the exact numbers you’ll want to use in your own space.
0 of 3 items selected





Leave a comment