Free Shipping in the USA on nearly all items!
Limited phone hours during the Holidays! Call us: 888-611-9305
Free Shipping in the USA on nearly ALL items! Limited phone hours during the Holidays!

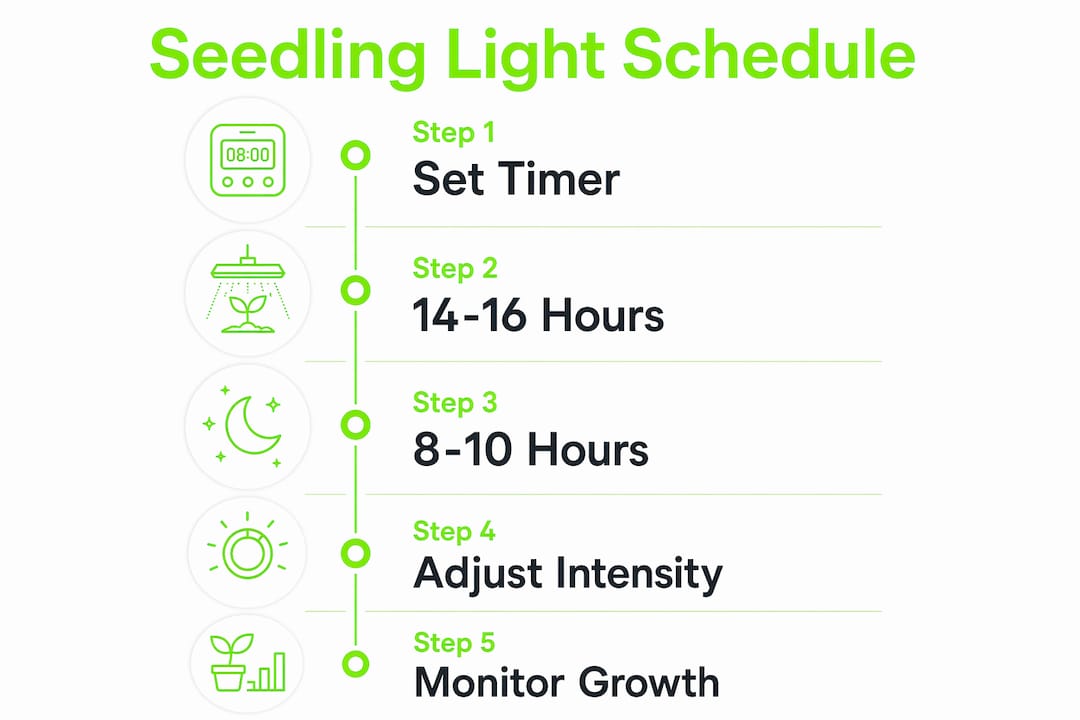
The ideal seedling light schedule is 14–16 hours of full-spectrum light daily, followed by 8–10 hours of darkness for rest and healthy root development. Getting this right from day one is the single most important factor in producing compact, transplant-ready seedlings indoors. When you set a light schedule for seedlings as a beginner, you avoid the two most common failures: leggy, stretched stems from too little light and stressed, bleached leaves from too much. Modern LED grow lights and plug-in timers make the whole process far more manageable than it was even five years ago.
Seedlings require 14–16 hours of light daily, with 8–10 hours of uninterrupted darkness. That dark period is not wasted time. During darkness, seedlings process growth hormones and redirect carbohydrates from leaves down to developing roots.
Running lights 24 hours a day is one of the most common beginner mistakes. Continuous light causes stress responses in most vegetable and herb seedlings, including tomatoes, peppers, and basil. The result is poor cell development and weak stems, even when the light itself is high quality.
Here is what happens during each phase:
Consistent light schedules reduce bolting in crops like tomatoes, peppers, and brassicas. Plants develop sturdier stems under stable photoperiods compared to variable or 24-hour lighting.
Pro Tip: Set your timer to turn lights on at the same time every morning. Seedlings respond to rhythm. A timer that fires at 6 a.m. and shuts off at 9 p.m. gives you a reliable 15-hour cycle without any manual effort.
Light intensity for seedlings is measured in PPFD (photosynthetic photon flux density), expressed in µmol/m²/s. The right PPFD depends on the growth stage, and getting it wrong in either direction causes visible problems within days.
Intensity targets by growth stage follow a clear progression. Start low and ramp up gradually as seedlings mature:
Ramping intensity gradually from 30–40% at germination to 90–100% at transplant avoids shock and promotes compact growth throughout the cycle.
| Fixture Type | Recommended Distance | Notes |
|---|---|---|
| T5 LED bars | 3–6 inches above canopy | Low heat, safe for close placement |
| Full-spectrum LED panels | 24–30 inches above canopy | Reduce height as seedlings mature |
| Quantum board LEDs | 18–24 inches at low power | Dim to 40–50% for early stages |
| CFL bulbs | 2–4 inches above canopy | Low intensity, requires close proximity |
T5 LEDs can be placed 3–6 inches above the canopy, while full-spectrum LED panels need 24–30 inches to avoid light burn. If seedlings stretch upward, the light is too far away. If leaves curl or bleach, the light is too close or too intense.
Pro Tip: Hang a piece of white paper at canopy level and hold your hand above it. If the light feels warm after 30 seconds, it is too close for young seedlings.
The three main options for indoor seedling lighting are LED, CFL, and HID. Each has real trade-offs that matter for beginners.
| Light Type | Pros | Cons | Best For |
|---|---|---|---|
| LED (T5 bars, quantum boards) | Low heat, energy efficient, dimmable | Higher upfront cost | All stages, especially beginners |
| CFL (compact fluorescent) | Low cost, widely available | Less efficient, limited coverage | Small trays, budget setups |
| HID (metal halide) | High output, proven results | High heat, high energy use | Large-scale or advanced setups |
For most beginners, LED is the clear choice. Full-spectrum LEDs in the 5000K–6500K color temperature range deliver the blue-weighted spectrum that promotes tight internode spacing and compact seedlings. Red-heavy spectra in the 2700K–3000K range encourage stretch and are better suited for flowering stages.
Blue light in the 400–500 nm range, when it makes up 15–25% of the total spectrum, suppresses stem elongation and keeps seedlings compact. This is why a full-spectrum white LED with moderate blue content outperforms a red-dominant light for seed starting.
For uniform coverage, multiple low-intensity light bars per shelf outperform a single intense source. T5 LED bars cover entire trays evenly, reducing leggy edges and burned centers. A single high-power panel creates a hot spot in the middle and weaker light at the tray edges, which produces uneven seedlings in the same flat.
You can learn more about the differences between these technologies in this LED, CFL, and HID comparison from Ledgrowlightsdepot.
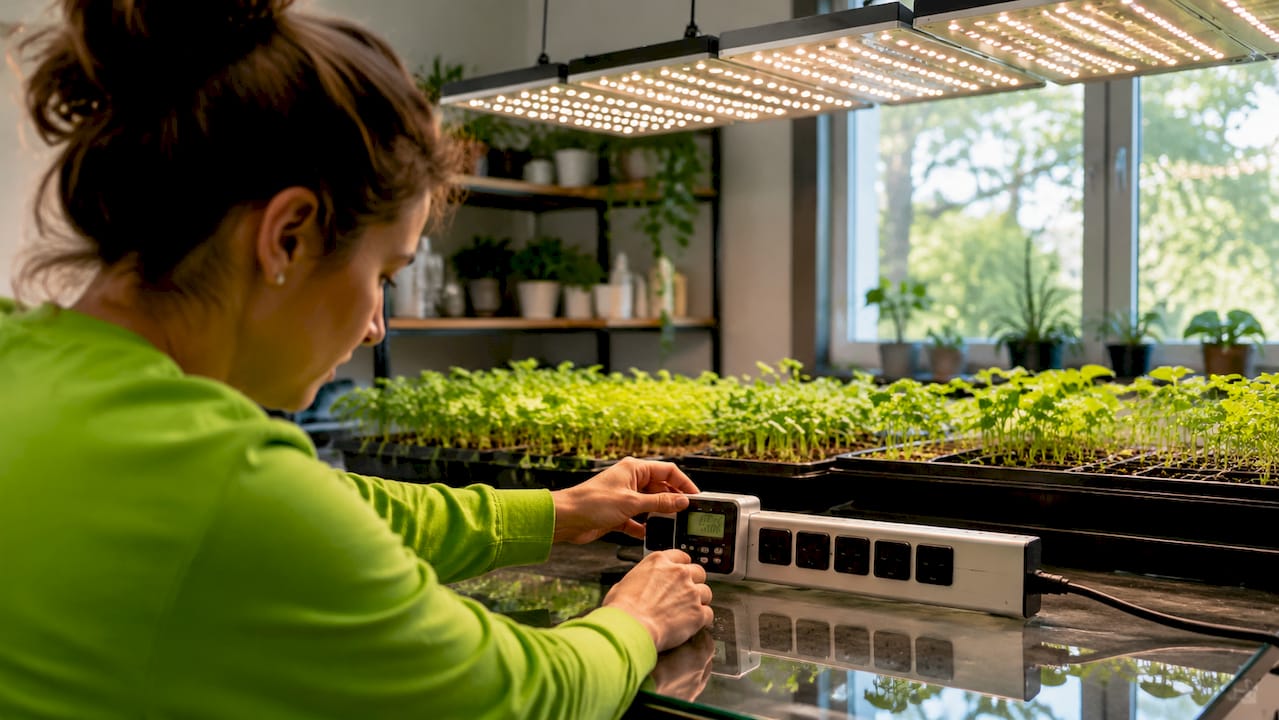
Setting up a reliable indoor seedling lighting routine takes about 20 minutes. Follow these steps and you will have a consistent, automated system running from day one.
Using a timer for consistent 14–16 hour cycles is critical. Inconsistent schedules cause stretch and irregular growth across a tray. Timers remove human error entirely, which is the single biggest reliability upgrade a beginner can make.
Pro Tip: Label your timer with the on and off times using a piece of tape. When you come back after a power outage, you can reset it in seconds without guessing.
Most seedling lighting problems show up within three to five days of an incorrect setup. Knowing what to look for saves you from losing an entire tray.
Signs of too little light:
Signs of too much light:
When you see stretching, lower the fixture by 2–3 inches or increase intensity by 10%. When you see bleaching or curl, raise the fixture or reduce output. Make one change at a time and wait 48 hours before evaluating the result.
Different seedling types also need different adjustments. Tomatoes and peppers tolerate higher intensity at the true leaf stage and benefit from being pushed toward 400 µmol/m²/s earlier. Herbs like basil and cilantro prefer slightly lower intensity and are more sensitive to light burn. Brassicas like kale and broccoli are forgiving across a wide range.
As seedlings mature and approach transplant size, you can extend light duration slightly to 16 hours if growth seems slow. For seed germination under LED lights, the early stages require the most careful attention to both duration and intensity.
A successful seedling light schedule requires consistent daily duration, stage-appropriate intensity, and the right fixture type from the start.
| Point | Details |
|---|---|
| Daily light duration | Run lights for 14–16 hours and keep 8–10 hours of darkness every cycle. |
| Intensity by stage | Start at 100–200 µmol/m²/s at germination and ramp to 400–500 µmol/m²/s by transplant. |
| Spectrum matters | Use full-spectrum LEDs in the 5000K–6500K range to keep seedlings compact and prevent stretch. |
| Uniform coverage | Multiple T5 LED bars per shelf outperform a single intense source for even tray growth. |
| Automate with a timer | A plug-in timer eliminates schedule inconsistency, the most common beginner mistake. |
The advice I give beginners most often is this: trust the schedule before you trust your instincts. When I first started growing indoors, I kept adjusting the timer because seedlings “looked fine” at 12 hours. They were not fine. They were just slow to show the problem. Leggy stems showed up two weeks later, right before transplant, when it was too late to fix.
The 14–16 hour rule exists because it works across almost every vegetable and herb you will start from seed. Start there. Do not experiment with 18-hour cycles or skip the dark period because you read something on a forum. Give the standard schedule four to six weeks before you decide it needs changing.
The other thing I see beginners get wrong is fixating on a single powerful light. One bright panel feels like the obvious solution. It is not. Uniform coverage beats raw intensity every time at the seedling stage. Two T5 LED bars covering a full tray will outperform one expensive panel hung too high in the center. I have seen this play out dozens of times.
Modern dimmable LEDs have genuinely changed what is possible for home growers. The ability to start at 30% and ramp up weekly removes most of the guesswork that used to come with seedling lighting. If your fixture does not have a dimmer, adjust height instead. The principle is the same.
Observe your plants every day. They will tell you what they need faster than any chart will. The chart gets you close. The plant gets you there.
— Scott
Building a reliable seedling light setup starts with the right fixture and a timer you can count on. Ledgrowlightsdepot carries a full range of adjustable, full-spectrum LED grow lights designed for every stage from germination to transplant. Whether you need a compact T5 bar setup for a single shelf or a dimmable quantum board for a larger grow space, the selection covers beginner budgets and serious home growers alike. The Medic Grow GLC-1 lighting controller makes programming precise light schedules and dimming levels straightforward, even if you have never set up a grow room before.
Ledgrowlightsdepot holds a 4.8 out of 5 rating from more than 5,800 customer reviews. Browse the full catalog to find a fixture matched to your tray size, budget, and growth stage.
Seedlings need 14–16 hours of light daily and 8–10 hours of darkness. The dark period is required for growth hormone processing and root development.
No. Continuous light stresses most seedling varieties and disrupts the dark-period processes that support root growth. Stick to a 14–16 hour on cycle with a timer.
Full-spectrum LEDs in the 5000K–6500K range work best. Blue light in the 400–500 nm range suppresses stem elongation and keeps seedlings compact before the flowering stage.
T5 LED bars can sit 3–6 inches above the canopy. Full-spectrum LED panels should start at 24–30 inches and move closer as seedlings mature and intensity is reduced.
Yes. A timer is the most reliable way to maintain a consistent light schedule. Inconsistent cycles cause stretch and uneven growth, which a simple plug-in timer prevents entirely.
{"one"=>"Select 2 or 3 items to compare", "other"=>"{{ count }} of 3 items selected"}

Leave a comment