
Free Shipping in the USA on nearly all items!
Limited phone hours during the Holidays! Call us: 888-611-9305
Free Shipping in the USA on nearly ALL items! Limited phone hours during the Holidays!

Daily Light Integral (DLI) measures the total amount of photosynthetically active light a plant receives in a single day, expressed in mol·m⁻²·day⁻¹. It is the product of PPFD (µmol·m⁻²·s⁻¹) and photoperiod length, calculated using the standard formula from Virginia Tech: DLI = PPFD × hours × 3,600 / 1,000,000, or the shorthand DLI = PPFD × hours / 277.8. For cannabis and other high-light crops indoors, the practical targets are:
With CO₂ enrichment at 1,000–1,500 ppm and well-controlled VPD, the useful ceiling shifts upward into the 55–60+ mol·m⁻²·day⁻¹ range. Without supplemental CO₂, pushing past 50 mol·m⁻²·day⁻¹ produces diminishing photosynthetic returns and risks heat and light stress.
Optimal DLI for indoor cannabis requires stage-matched targets, accurate canopy measurement, and at least one practical adjustment lever — photoperiod, intensity, or under-canopy supplementation.
| Point | Details |
|---|---|
| Core DLI formula | DLI = PPFD × hours / 277.8; use canopy-average PPFD, not peak center readings. |
| Stage targets for cannabis | Seedlings: 10–25; veg: 25–40; flower: 35–50 mol·m⁻²·day⁻¹ without CO₂ enrichment. |
| CO₂ raises the ceiling | With CO₂ at 1,000–1,500 ppm and controlled VPD, the useful DLI ceiling shifts to 55–60+ mol·m⁻²·day⁻¹. |
| Longer and dimmer beats shorter and intense | Same DLI at lower PPFD over more hours reduces heat load and VPD stress at the leaf surface. |
| LedGrowLightsDepot proximity systems | Under-canopy and proximity-mounted fixtures close the top-to-bottom DLI gap, the primary source of untapped yield in most indoor setups. |
PPFD is a snapshot. It tells you how many photons are hitting the canopy at a single instant, measured in µmol·m⁻²·s⁻¹. DLI is the cumulative dose, the total photon delivery across the full photoperiod. A grower who checks PPFD at 800 µmol·m⁻²·s⁻¹ and calls it good has only half the picture. Run that same fixture for 18 hours and the DLI is 51.8 mol·m⁻²·day⁻¹, well above the recommended flowering ceiling without CO₂. Run it for 12 hours and DLI drops to 34.6 mol·m⁻²·day⁻¹, which is appropriate for early flower. Same fixture, same PPFD reading, two very different outcomes.
Relying on PPFD alone is one of the most common reasons growers running 20/4 or 18/6 schedules see symptoms that look like nutrient lockout but are actually light overload.
Why PAR matters and lux does not:
For a deeper breakdown of these metrics, the PAR, PPFD, and DLI guide from LedGrowLightsDepot covers each unit with practical examples.
The math is straightforward. Two equivalent forms of the formula:
The 277.8 divisor is simply 1,000,000 ÷ 3,600, a single-step shortcut that produces the same result. The Omni DLI Calculator uses this same formula and lets you plug in PPFD and hours directly.
Worked example 1 — vegetative stage (18-hour photoperiod):
Worked example 2 — flowering stage (12-hour photoperiod):
Both examples reach the same DLI through different combinations of intensity and time. For a quick conversion reference, the table below covers common PPFD values across typical photoperiods.
PPFD vs. hours quick-reference table (DLI in mol·m⁻²·day⁻¹):
For a practical conversion reference specific to leafy greens and other crops, the PPFD-to-DLI conversion guide at LedGrowLightsDepot provides additional worked tables.
Accurate measurement starts with the right instrument and a proper sampling protocol. A single center reading gives you one data point, not a canopy average.
Instrument options:
Canopy sampling protocol:
Pro Tip: *Map under-canopy hotspots separately. Place the sensor at mid-canopy and lower-canopy heights at the same grid points.
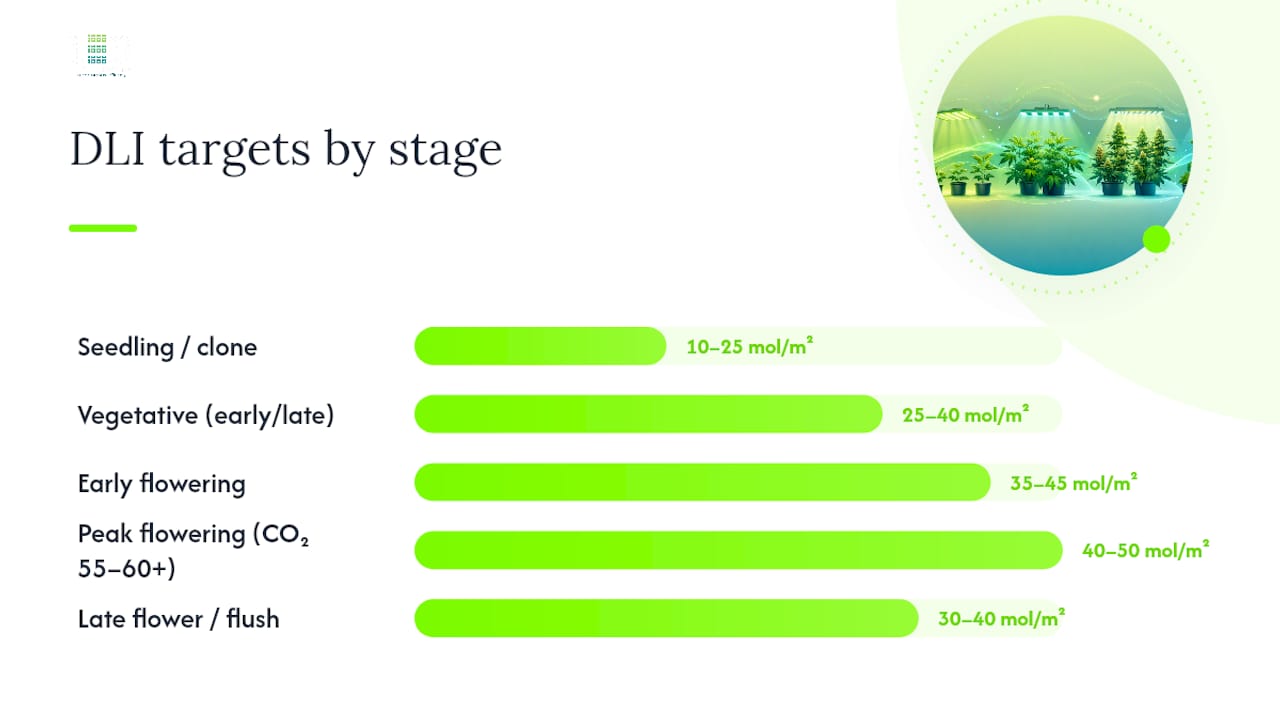
The ranges below reflect commonly cited guidance for cannabis across growth stages. CO₂ enrichment shifts the upper ceiling upward, but only when temperature, humidity, and airflow are precisely controlled.
| Growth Stage | Target DLI (mol·m⁻²·day⁻¹) | Notes |
|---|---|---|
| Seedling / clone | 10–25 | Low intensity; avoid heat stress on unrooted cuttings |
| Early vegetative | 25–35 | Ramp up gradually as root zone establishes |
| Late vegetative | 35–40 | Full canopy development; 18 h photoperiod common |
| Early flowering | 35–45 | 12 h flip; maintain PPFD, not hours |
| Peak flowering | 40–50 | Highest demand; CO₂ raises ceiling to 55–60+ |
| Late flower / flush | 30–40 | Reduce slightly; some cultivars benefit from a taper |
Autoflowers do not require a 12/12 photoperiod to trigger flowering, so DLI delivery is more flexible. Most autoflower cultivars perform well at 25–40 mol·m⁻²·day⁻¹ across their entire lifecycle, typically under 18–20 hour photoperiods at moderate PPFD. The key is keeping DLI consistent rather than ramping it aggressively.
CO₂ guardrails: At ambient CO₂ (~400 ppm), photosynthesis saturates at lower light doses. Enriching to 1,000–1,500 ppm raises the light saturation point, making DLI values above 50 mol·m⁻²·day⁻¹ productive rather than stressful. Without CO₂ supplementation, pushing past 50 mol·m⁻²·day⁻¹ accelerates diminishing returns and increases the risk of photooxidative stress. CO₂ enrichment only pays off when temperature (75–85°F), VPD (0.8–1.4 kPa in flower), and airflow are all dialed in simultaneously.
DLI has five practical levers: photoperiod length, fixture output, mounting height, optics, and canopy management. Adjust one variable at a time and re-measure before making a second change.
To increase DLI:
To decrease DLI:
Pro Tip: When targeting the same DLI with a longer, dimmer schedule versus a shorter, more intense one, the longer/dimmer approach tends to reduce heat load and VPD stress at the leaf surface. For example, 720 µmol·m⁻²·s⁻¹ × 15 hours and 600 µmol·m⁻²·s⁻¹ × 18 hours both deliver approximately 38.9 mol·m⁻²·day⁻¹, but the lower-intensity schedule is easier on temperature and humidity management.
Lighting automation makes this much easier to manage consistently. The lighting controls and automation guide from LedGrowLightsDepot covers how environmental controllers and timers can schedule photoperiod and dimming changes automatically.
Example A: Veg room, 4×4 tent, 18-hour photoperiod
A grower measures a 3×3 grid across the canopy and records these PPFD values (µmol·m⁻²·s⁻¹): 620, 590, 610, 640, 680, 630, 600, 570, 610. The average is 617 µmol·m⁻²·s⁻¹.
DLI = 617 × 18 / 277.8 = 39.9 mol·m⁻²·day⁻¹
That sits at the top of the late-veg target range. No adjustment needed; the grower can proceed to flower flip when the plant is ready.
Example B: Flower room, 5×5, 12-hour photoperiod
Grid average PPFD: 850 µmol·m⁻²·s⁻¹.
DLI = 850 × 12 / 277.8 = 36.7 mol·m⁻²·day⁻¹
That is below the peak-flower target of 40–50 mol·m⁻²·day⁻¹. Options: raise PPFD to ~1,000 µmol·m⁻²·s⁻¹ (DLI = 43.2), or add under-canopy supplemental fixtures to increase the effective canopy average without changing the top-light intensity.
Quick-reference: hours needed to reach target DLI at a given PPFD
*Values above 20 hours or marked with an asterisk exceed practical photoperiod limits for photoperiod-sensitive cannabis. Raise PPFD instead of extending hours past 20.
Higher DLI costs more to run. The question is whether the yield increase justifies the added electricity.
A simple cost check: multiply the additional fixture wattage by the extra hours per day, then by your electricity rate. A 720W fixture running 2 additional hours per day at $0.15/kWh adds $0.216/day, or roughly $6.48 per 30-day cycle. If that 2-hour extension moves DLI from 35 to 45 mol·m⁻²·day⁻¹ and produces even a modest yield increase, the math typically favors the change in a home grow. Commercial operations with 50+ fixtures need to run the same calculation at scale before assuming the payback holds.
Pro Tip: Before adding CO₂ to push DLI past 50 mol·m⁻²·day⁻¹, price out the full system cost: CO₂ tank or generator, HVAC upgrades to handle the higher heat load, and a reliable IAQ monitor. A device like the Awair Glow IAQ monitor tracks CO₂ concentration alongside temperature and humidity so you can confirm that enrichment conditions are actually being met before committing to higher light doses.
CO₂ enrichment makes economic sense in sealed or semi-sealed rooms where temperature and VPD are already well-controlled. In a tent with passive ventilation, CO₂ bleeds out too quickly to maintain the 1,000+ ppm needed to shift the light saturation point. Fix the environment first, then consider CO₂.
Symptoms from too little or too much DLI can mimic nutrient deficiencies and pH problems. Rule out those causes first (check runoff pH, EC, and inspect roots) before adjusting light dose.
Signs of too-low DLI:
Signs of too-high DLI:
Immediate first-aid steps:
A controlled grow using proximity-mounted LED fixtures and under-canopy supplemental lighting demonstrated how canopy uniformity responds to targeted DLI management. The baseline setup used a single top-mount fixture with no under-canopy fill.
After adding under-canopy supplemental bars at mid-canopy height and adjusting the top fixture to a proximity-optimized mounting distance, the lower-canopy DLI increased substantially. LedGrowLightsDepot’s proximity system approach is designed around exactly this principle: closing the top-to-bottom DLI gap rather than simply raising overall intensity.
Improving under-canopy DLI uniformity, rather than increasing peak top-canopy intensity, is where most indoor growers find their largest untapped yield gains. The lower bud sites are already present; they just need adequate light dose to develop fully.
LedGrowLightsDepot reports that growers using their proximity fixture systems have seen yield increases exceeding 20% alongside improved bud grading, with the primary mechanism being more uniform DLI distribution across the full plant height rather than higher peak PPFD at the top canopy. The limitation worth noting: results vary by cultivar, canopy training method, and room configuration. A single-cola SOG setup responds differently than a heavily trained manifold or ScrOG.
DLI often delivers the highest practical yield uplift per dollar of effort in an indoor grow, but that ranking depends on where your current setup sits. If VPD is badly out of range (below 0.6 or above 1.6 kPa in flower), fixing it first will produce more visible results than any light adjustment. Plants under VPD stress cannot use the light they already have efficiently. The same logic applies to severe pH or EC problems.
Once the basics are stable, DLI is the next lever to pull. The GrowGuide data from 1,000+ tracked grows places DLI as a high-leverage control after VPD and basic nutrition, and that matches what most experienced growers observe in practice.
Prioritization order:
DLI is necessary but not sufficient. Measure everything together, not in isolation.
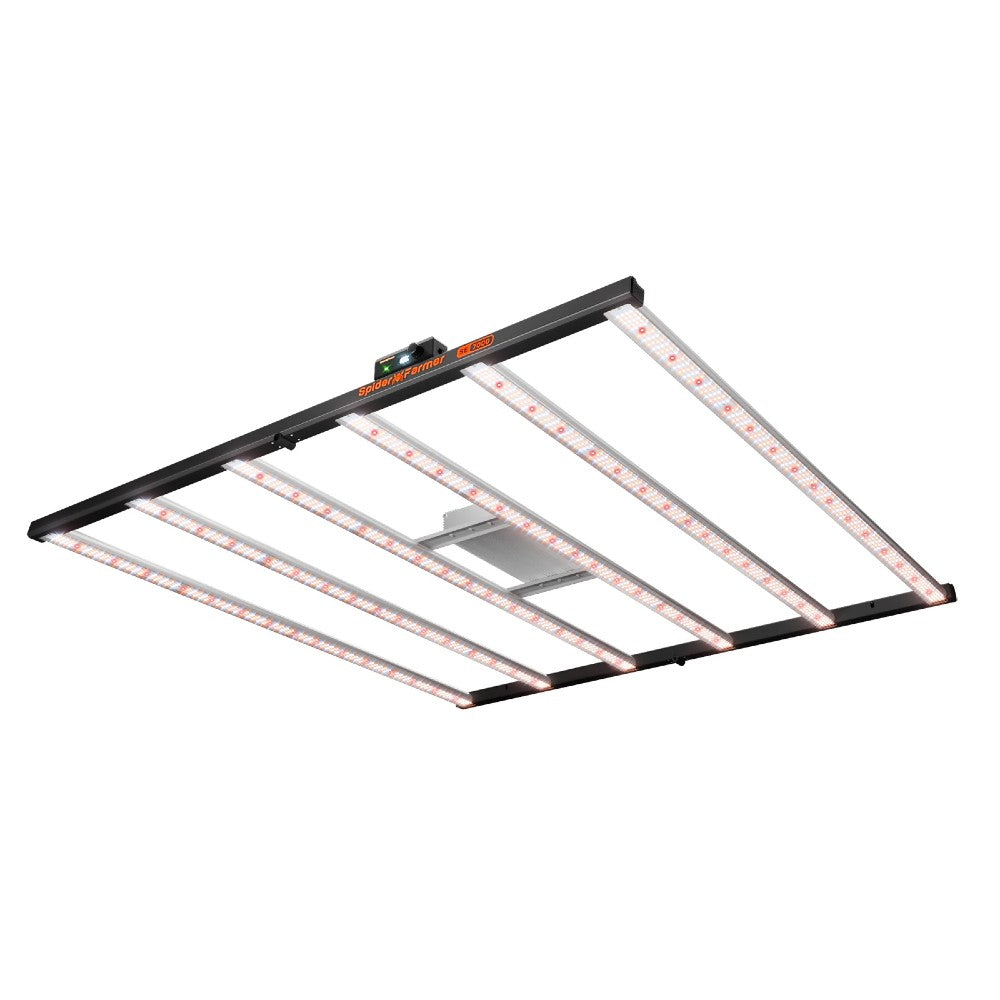
Hitting your target DLI consistently requires fixtures that deliver measurable, repeatable PPFD across the full canopy, not just at the center point. LedGrowLightsDepot carries a range of LED systems built specifically for this kind of precision.
For high-output veg and flower rooms targeting 40–50 mol·m⁻²·day⁻¹, the Grower’s Choice ROI-E720 delivers commercial-grade output with uniform canopy coverage. Growers who need tight proximity control and under-canopy options will find the ThinkGrow LED Model-I and ThinkGrow LED Model-I Plus designed for exactly that application. For filling lower-canopy DLI gaps without raising top-light intensity, the Sunblaster Micro LED Grow Light Garden works as a practical interlighting solution in tents and vertical racks. The HortiBloom Mega Optic 720W and HortiBloom Mega Eco 720 add optic-lens flexibility and energy efficiency for medium-to-large rooms. The HortiBloom Mega Optic 500W covers medium footprints where balancing wattage and DLI target is the primary constraint. Browse the full fixture lineup at LedGrowLightsDepot and use the product pages to match output specifications to your stage-specific DLI targets.
0 of 3 items selected





Leave a comment