
Free Shipping in the USA on nearly all items!
Limited phone hours during the Holidays! Call us: 888-611-9305
Free Shipping in the USA on nearly ALL items! Limited phone hours during the Holidays!

A compact grow tent is a self-contained, light-sealed growing environment that lets city apartment dwellers cultivate plants indoors with full control over light, temperature, and humidity. The standard entry point for apartment cultivation is a 2x2 foot tent, which yields 4–8 ounces per cycle and runs at roughly $0.60 per day in operating costs. That footprint fits inside a closet, a corner of a bedroom, or a spare nook without disrupting your living space. For urban growers who want real harvests from a compact grow tent in a city apartment, the setup is more accessible than most people expect.
Size selection is the single most consequential decision you make before buying anything else. Get it wrong and you either waste space or crowd your plants into a setup that cannot support healthy growth.
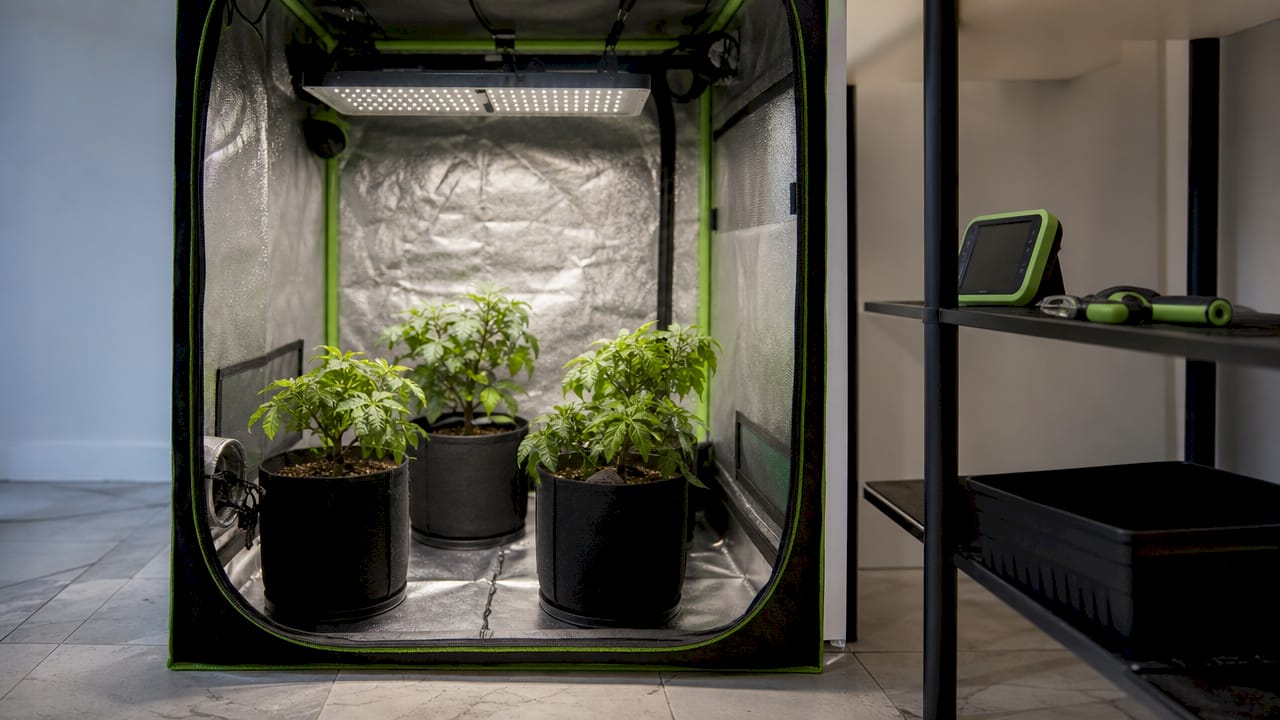
The 2x2 tent fits closets and corners and is the most popular choice for apartment growers. It holds 1–4 plants comfortably, requires 100–150 watts of LED lighting, and demands a 4-inch inline fan for adequate airflow. The 2x4 tent doubles the canopy area and suits growers who want to run two strains simultaneously or increase output without moving to a dedicated room.
| Feature | 2x2 tent | 2x4 tent |
|---|---|---|
| Floor footprint | 4 sq ft | 8 sq ft |
| Plant count | 1–4 plants | 4–8 plants |
| LED wattage needed | 100–150W | 200–300W |
| Estimated yield per cycle | 4–8 oz | 8–16 oz |
| Best placement | Closet, corner | Spare room, large closet |
Vertical space matters as much as floor area. Many plants grow taller than wider, so a tent with at least 5 feet of interior height gives you room to hang lights and still train the canopy. Tents under 4 feet tall force you into aggressive topping, which adds complexity for beginners.
Pro Tip: Before buying, tape out the tent’s footprint on your floor and open the tent door in your mind. You need at least 18 inches of clearance in front to water, train, and inspect plants without contorting yourself.
A complete setup has five core components. Each one affects the others, so skimping on any single piece creates a bottleneck that limits your entire grow.
A complete 2x2 kit costs $60–$150 and typically bundles the tent, fan, filter, and light together. Buying a kit removes the guesswork of matching components and usually saves money compared to purchasing each piece separately.
Pro Tip: Place your inline fan on a hard surface or use anti-vibration mounts. Soft flooring amplifies fan vibration and creates a low hum that carries through apartment walls. A $10 rubber mat under the fan solves this before it becomes a neighbor complaint.
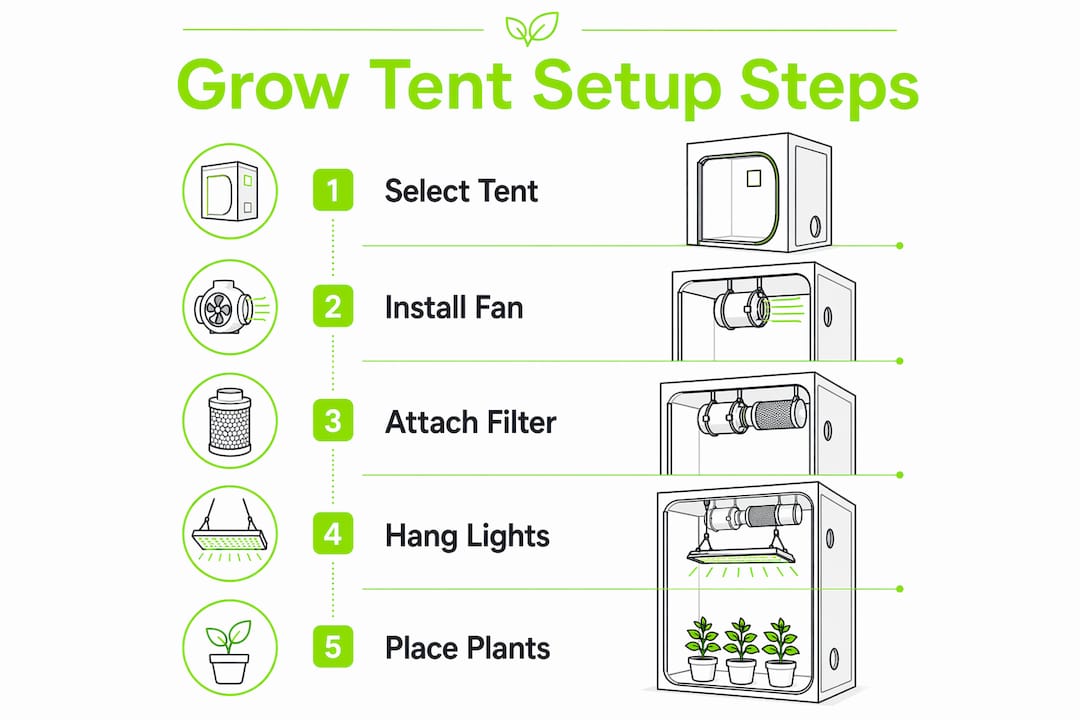
Setup takes 2–4 hours for a first-time grower. Following the steps in order prevents the most common mistakes, which usually involve installing lights before ventilation or placing the tent in a location with no power access.
Common setup mistakes to avoid:
The biggest yield gains in a small tent come from canopy management, not from buying more equipment. Plants left to grow naturally in a 2x2 tent will compete with each other and block light from reaching lower bud sites.
Low-stress training (LST) is the most effective technique for small spaces. You bend and tie branches outward and downward to create a flat, even canopy that exposes every bud site to direct light. LST requires no cutting, so it is low-risk for beginners and works well with both photoperiod and autoflowering plants.
Pot sizing directly affects how much you can train. Using 1–2 gallon fabric pots keeps plants at a manageable size and makes it easier to reposition them during training. Larger pots encourage bigger root systems and taller plants that quickly outgrow a 2x2 tent.
Key environmental targets for healthy plants:
Odor control in an apartment requires a properly sized carbon filter rated for your tent volume. A filter that is too small for your fan’s CFM rating will not scrub all the air passing through it. Match filter and fan ratings when purchasing, and replace the carbon media every 12–18 months.
Grow tents improve light efficiency by reflecting and containing light within the enclosed space. That means every watt your LED produces goes toward your plants rather than lighting up a room. For apartment growers paying for electricity, this is a real cost advantage.
A compact grow tent in a city apartment produces consistent, measurable harvests when you match tent size to your space, use the right equipment, and manage the canopy actively.
| Point | Details |
|---|---|
| Start with a 2x2 tent | A 2x2 tent fits most apartment spaces and yields 4–8 oz per cycle at low operating cost. |
| Match fan and filter ratings | Pair your inline fan and carbon filter by CFM rating to control odor and temperature effectively. |
| Use fabric pots | 1–2 gallon fabric pots improve root oxygenation and make canopy training easier in tight spaces. |
| Keep light at the right height | Position your LED 18–24 inches above the canopy and adjust it as plants grow. |
| Train your canopy | Low-stress training flattens the canopy and exposes more bud sites to direct light without cutting. |
Most new growers obsess over lights and ignore airflow. That is the wrong priority. A great LED in a tent with poor ventilation will still produce weak, heat-stressed plants. The fan and carbon filter are the unglamorous backbone of every successful apartment setup, and they deserve as much attention as the light you hang above your plants.
The other thing I have seen trip up beginners repeatedly is tent placement. Growers pick a spot based on convenience, not on airflow or temperature. A tent jammed into a corner with no rear clearance will run 5–10°F hotter than one with a few inches of breathing room. That temperature difference alone can cut your yield noticeably.
Automation has changed apartment growing more than any single piece of hardware. Smart climate controllers that adjust fan speed based on real-time temperature and humidity readings remove the daily manual checks that make growing feel like a second job. If you are serious about growing year-round in a small space, a controller is worth the investment early, not as an upgrade later.
The last thing I will say: grow tents give urban apartment dwellers something that outdoor gardeners take for granted, which is the ability to garden on their own schedule, in any season, without depending on weather. That independence is the real value of the setup, not just the yield.
— Scott
City apartment growers need equipment that fits tight spaces, runs quietly, and delivers real results from the first cycle. Ledgrowlightsdepot carries complete grow tent kits built specifically for that use case, including the Spider Farmer 2x2 complete kit with a full-spectrum LED, inline fan, and carbon filter bundled together. Growers who want a slightly larger footprint can step up to the Spider Farmer 2x4 kit, which includes a temperature and humidity controller.
For growers who want to automate their light schedules without manual timers, the Medic Grow GLC-1 lighting controller integrates with most LED fixtures and lets you program precise on/off cycles from a single interface. Ledgrowlightsdepot holds a 4.8 out of 5 customer satisfaction rating from more than 5,800 reviews, and their team can help you match the right kit to your specific apartment setup.
A 2x2 foot tent is the best starting size for most city apartments. It fits in a closet or corner, requires only 100–150 watts of LED, and yields 4–8 ounces per growth cycle.
A complete 2x2 kit including tent, fan, carbon filter, and LED light costs $60–$150. Operating costs run approximately $0.60 per day with 18 hours of light and ventilation running.
A carbon filter matched to your inline fan’s CFM rating removes odors before air exits the tent. Replace the carbon media every 12–18 months to maintain effectiveness.
Yes. Grow tents provide environmental isolation, meaning the interior climate stays stable even when the surrounding apartment temperature fluctuates. The inline fan and carbon filter system actively manages heat and humidity inside the tent.
Autoflowering cannabis strains, compact herbs like basil and mint, and dwarf tomato varieties all perform well in a 2x2 tent. Autoflowers are especially suited to small spaces because they stay short and finish on a fixed timeline regardless of light schedule.
0 of 3 items selected





Leave a comment