


From our friends BigBud and MaryJane Farmer at 420Beginner.com
Want to grow plants at home? Wondering how to get started or what equipment you might need? Not sure you’ve got enough space or whether it’s going to be cost-effective? Whatever your question, in this step by step grower’s guide we’ve got you covered. Think of this as Cannabis Growing 101. You’re about to start learning, step by step, how to grow your first crop of lush, green marijuana.
The First Step: Choosing The Right Seed
True, there is another way to get started, by taking a cutting from an existing plant and cloning it… However, for beginners, we’d recommend growing from seed. Germination rate is 85% or above, whereas the success rate for growing cloned plants is around 50%. And you need to have access to a plant to take the cutting from, which isn't going to be the case for most beginners.
How to Choose Cannabis Seed
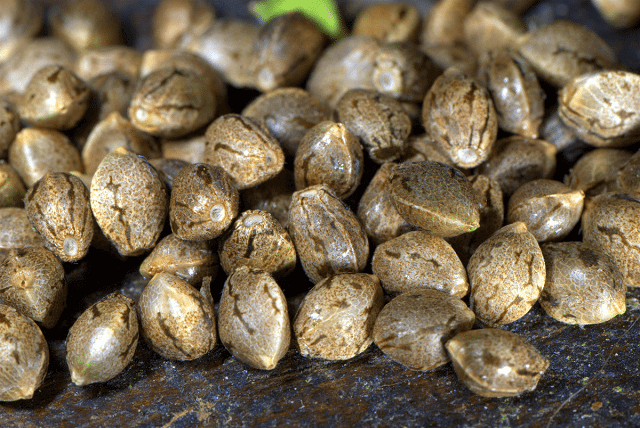
The seed is like a sleeping embryo, the result of sexual propagation between male and female flowers. Only healthy parent plants will produce healthy top quality seeds. All the features of the plant, be it the height, color, aroma or quality, all depend on the seed. If you want good quality marijuana, you need good quality seeds. Check this well-known site that offers a wide variety. But how do you select a seed worth growing? Avoid pale seeds, green seeds, and soft or damaged seeds. These are not mature or ready for germination. Cannabis seeds should have a hard outer shell. So what you’re looking for is hard, dark brown teardrop-shaped seeds, with darker tiger stripes (these are usually Indica seeds) or brown, black or tan mottling (usually Sativa). There are numerous strains of seed available. But whatever the strain, you’ll also need to choose between regular seeds that could produce male or female plants and feminized seeds that should produce only the bud-producing female plants you’re aiming to harvest. However, with feminized seeds, there’s still about a 5% chance of hermaphrodite plants, which produce both male and female flowers and self-pollinate. (You can also check out this beginner's guide to choosing your first seeds.)
Germination of Cannabis Seeds
After selecting the right seed, the next step is germination. Germination is a process in which the outer shell of a healthy and mature seed, kept in the correct environmental conditions (moisture, air and warmth), breaks down and a white colored root begins to sprout from it, dropping downward. Here’s what you need to learn: only 2 or 3 out of 10 non-feminized seeds will become healthy female marijuana plants, others may spoil or grow as male plants. So take that into account when deciding how many seeds to germinate. The average time, a healthy seed takes to germinate is about 2 to 7 days, but the period may vary depending on quality of seed, temperature, moisture, etc. After the germination process, you’ll be looking to remove all the male or less developed sprouts and focus on raising the healthy female marijuana plants. (More on that later.) If you don't have as many female plants as you'd like, you may want to begin another germination process as soon as possible. Our advice is also to germinate in the hot months for more effective results. A growing/grower mat can help germination too, but is an extra expense. Once the seed has germinated, the white colored, root-shaped sprout should grow longer and longer. When the size reaches about a quarter inch it’s the perfect time to transfer it to another medium such as rockwool tray or any other pot where it has space to become a baby plant. From there, it will eventually be transferred into the garden or a hydroponic system.
How to Germinate a Cannabis Seed
There are many techniques to start germination. But one good tip for the beginner is to practice them on other common seeds first, rather than waste expensive marijuana seeds. The different techniques for germinating seed are as follows:
Soaking
This is the most reliable technique of germinating marijuana or any other seed. In this method you need a normal coffee cup filled with warm water. Put the seeds into the warm water. If some seeds float to the top, remove them. The next step is to cover the cup with a lid so that light is unable to reach inside. Expect the seeds to germinate in the following 48 hours or so. Some seeds will even begin to sprout within 24 hours.
Germination in Soil
Some farmers prefer to germinate in the soil. This method is also easy and it really works. You need to take a pot filled with soil, pour water in it and let it drain from the hole at the bottom of the pot. Dig a little soil from its surface and push a pencil or any other pointed tool down about a quarter inch deep. Now put the seed in and then fill up the space with the soil you dug from the surface. Spray water and keep it moist until you find a small sprout coming up from the soil. Remember that it will require a normal room temperature to germinate in soil, which is around 78 degrees Fahrenheit. Usually, with this method seeds take 5 to 7 days to germinate.
Propagation Kits
Propagation kits are inexpensive and give good results. They will come with their own instructions, but generally you have to pour the seeds into tiny pots or compartments, add the germination hormone or nutrient mix that comes with the kit, and the process gets started. You can even create your own propagation machine, although purchasing it from market doesn't cost you much.
Paper Towel Method
Two dishes, two paper towels and some water is needed for this method of germination. You have to boil some water, rinse both the dishes with it so that there are no germs left. Now soak the paper towels in the hot water and squeeze them so that they become damp and warm. Place one paper towel on a dish, put some seeds on it, cover them with another paper towel and then use the second dish as a lid. This is necessary to prevent light entering this environment. Seeds will take 2 to 5 days to germinate through this method. Remember that you don’t want to leave the germinated seeds on towel for too long. Transfer them from the paper towel as soon as the sprouts show their tips.
Germinating in Peat Briquettes
Soak a peat briquette in water and let it swell. Now push a seed into the hole. Keep it in a hot temperature, like in 95 degrees Fahrenheit. Keep it moist and wait for the sprouts to come out. This is the safest and most reliable method of germinating a marijuana seed. Note that you can select any of the above mentioned methods of germinating seed. Go with whichever suits you the best.
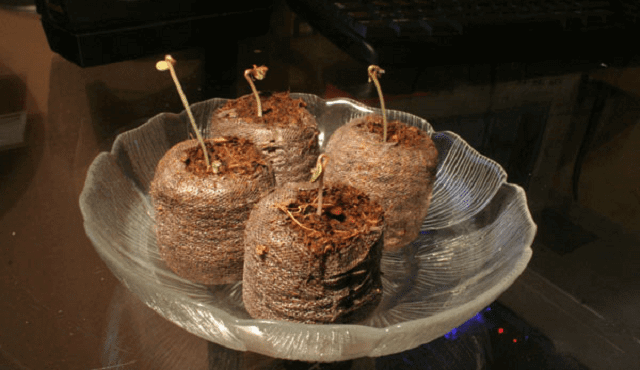
Cannabis Seedlings
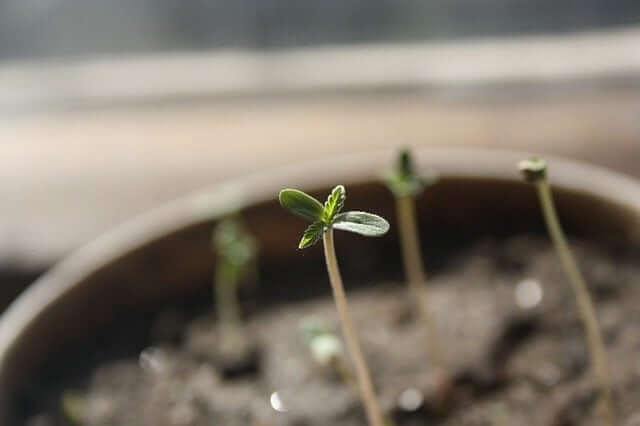
Once you see that the sprout is a quarter inch long then it’s time to replant it in a pot, where it will grow up to become a small marijuana plant. A marijuana seedling is basically a pair of two leaves that is generally called a ‘seedling leaf’ or ‘cotyledon’. The function of the cotyledon is initially to store the food and make the up-coming plant healthy. When the real leaves arrive, the cotyledon gets paler, yellow and then drops down. Real leaves at this stage of marijuana plant growth have 3 lamina. At this early stage, a baby plant needs intense care. Don’t water the plant too much—big mistake. Also pay attention to the amount of light it’s getting. If you’re a newbie grower, it’s worth noting here that the growth of plant appears slow at this stage. But in fact what’s happening is that the root system is developing. So do not over-fertilize or over-water the plant to increase its growth rate. It can kill your plant. Remember also that the marijuana seedling requires approximately 16 hours of light on a daily basis. Set your light to 15/30/30 (15% red, 30% blue, 30% white).
Transplanting
Whether you have your seedling process in a rockwool tray or in a pot, now is the time to transplant those seedlings into the garden or hydroponic system, where they will start to really grow and produce the material for some top quality weed. When transplanting the seedling, you should dig a hole in the soil and place the seedling carefully inside. You can drop the seedling in along with the rockwool tube, don’t worry. It won’t affect the growth of the plant in any manner, and removing it could damage the roots.
What You'll Need to Monitor During Growing
Now that your plants are growing and becoming a strong crop, you need to be careful with a few things. First and foremost, keep an eye on nutrient deficiency or excess. Both can have similar symptoms. But in general, look out for: lightening then yellowing in older mature leaves; spots of different kinds; various sorts of discoloration. The 3rd to 5th week can be the best time to determine whether your plant is growing healthily or not. If the color of the plant is perfect green, branches are strong and dense and everything looks fine during this period then you should be satisfied that it is growing the right way. Sometimes it appears that the stems of the plant in its early days are purple in color. Don’t worry. it’s a normal thing. It happens just because of genetics and nothing else.

Photo credit: Cannabis Training University - Own work, CC BY-SA 3.0
Low nitrogen level is good for female plants, while high nitrogen levels produce and nourish male plants efficiently. Too low and you'll see lightening and yellowing of the leaves. Moreover, keep the potassium level low for encouraging the growth of female plants and vice versa for male plants. Too low and you'll see a brown burnt-look to the tips and edge of the leaves, turning yellow further into the leaf. A general excess of nutrients—usually known as "nutrient burn"—is diagnosable by yellow or brown tips to the leaves. If nutrient levels aren't reduced, you'll see the discoloration travel further into the leaf and the tips will start to curl and become brittle. However, don't worry too much when you see initial signs in young plants, as the more they grow the more nutrients they need. The soil might be too rich for them now, but when they're a bit larger it will likely be ideal. Try to keep control over humidity and temperature if you are growing plants indoors. High humidity helps in increasing the growth rate of female plants, while low humidity is good for the growth of male. Likewise with the temperature: low temperature is helpful for female plants’ growth, while high temperature is good for male plants.
Temperature and humidity levels for female plants at different growing stages:
- Seedlings: 20-25ºC with lights on, 4-5º lower with lights off; 60-70% humidity.
- Vegetative: 22-28ºC; 40-70%.
- Flowering: 20-26ºC; below 55%.
- Late flowering (1-2 weeks before harvesting): 18-24ºC, 5-10º lower with lights off; 30-40%.
Recommended light settings for indoor cannabis at each growing stage
As far as lighting is concerned, blue spectrum light energy boosts up the growth rate of female plants, producing strong, large, healthy leaves; while red spectrum light when the plants enter the flowering stage promotes budding.- Seedlings: 15/30/30 (15% red, 30% blue, 30% white). Once seedling has leaves and has been above ground a week, 30/60/60.
- Vegetative: 30/60/60, 45/80/80 or 60/100/100 (depending on plant type, check recommendations when buying the seeds).
- Flowering: 100/100/100.
- Late flowering: 100/70/100.
N.B. These are the settings recommended by Kind LED. Their LED Grow Lights (some of the best on the market) allow setting red, blue and white levels individually.
How to Grow Seedlings into Mature Marijuana Plants
Now you are going to learn the most important things you need to know to become a perfectionist marijuana grower. It’s up to you which method and medium you select to grow your indoor marijuana. The topics we’re going to cover in this chapter include:
- Growing with Soil Using Germination Process
- Growing by Cloning Process
- Growing Hydroponically
We recommend first-time growers go with the most reliable means of cultivation, which is soil. The reason is simply that it is a cost-effective method and has fewer risks, compared to other methods. However, we’ll give you the step by step guide for all three of these cannabis growing methods, so that you have a proper idea of what method suits you the most and why.
Growing with Soil Using Germination Process
We've already covered why growing marijuana with soil is the best method for beginners. It is cost effective, fruitful and reliable. If you’re not interested in turning this growing thing into a large business, then you may choose to grow in the containers. For the beginners, growing in containers is easy to handle and has less chance of failure.
Growing in Containers
Growing in containers, you have a chance to look after each and every plant individually. This allows you to identify weak or poor quality marijuana plants early. A container can be of any sort including a pot, small bucket, wooden box or other similar thing. All you need to do is to make some holes (about 1 centimeter diameter) to drain out excess water and get air to the roots. Make sure that the color of the container is dark, ideally black, as it is helpful in ensuring light doesn’t penetrate to the roots. You can start off with small containers as they are much easier to handle. But you must be aware that as the roots of your plants grow longer you’ll eventually need to shift the plants (very carefully, so as not to damage the roots) from small containers to the larger ones—usually soon after you realize that rapid growth is beginning.
Make Your Own Container
You can prepare your own container using old and rejected pots, broad sized bottles and bowls. You should clean them first and then make appropriate sized holes beneath the pots. The holes must be big enough to drain all the excess water out. And ideally the container material shouldn’t let in the light.
Growing in the Ground
If you are growing marijuana at home, then you may not be able to find a suitable space to grow marijuana in the ground, outside, where there is abundant sunlight. But if the option’s available to you, it’s worth doing. You have to be careful about the spacing of the plants. Try to leave an appropriate but uniform space between each plant (3-4 feet, or more if you have the space) so that the productivity is maximized.
Choosing Soil Type
Remember that if you are growing cannabis in soil then you have to be choosy in selecting the type of soil. Make sure that the soil you are using for marijuana cultivation is drainable but does not completely drain all the water. It should be capable of retaining some water. The three factors to consider in selection of appropriate soil for marijuana include nutrients, PH level and texture. Organic soil has the capability to produce the best quality cannabis crop. Texture of soil also has a major role in the growing process of cannabis so make sure that it is fluffy, light and can drain excess water but retain what’s needed.
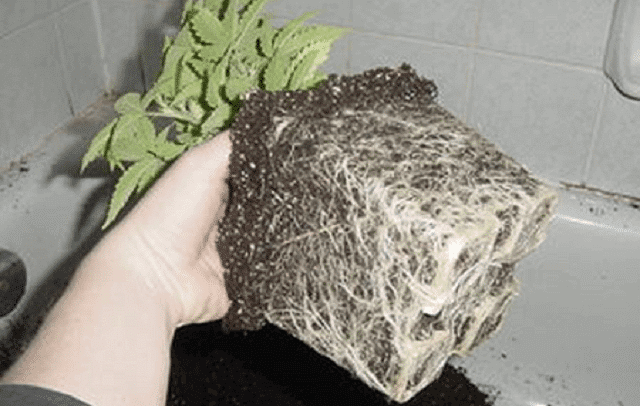
Transplanting Cannabis Plants
Transplanting means to convert the plants from small containers to bigger ones or shifting them from containers to the ground of your cultivating area. The method of transplanting is simple, but not easy. You need to take the plant out of the container carefully, along with the roots and all the soil around them. Dig the next home for this plant from its center and then place it in the hole. Transplantation can cause a little damage to the root system and some stress to the plants so they need some time to settle down. We would advise transplanting at night so that plant has an appropriate time to rest before light starts it growing and photosynthesizing again.
Main Nutrients Needed For Growing Cannabis
Plants need vitamins and minerals just like people. You can mix and match your own nutrients using our directions on the required ingredients, but why not choose an all-in-one starter pack like the one below? If you decide to make your own nutrient concoction, below are the main nutrients which play an important role in the growth of marijuana:
Nitrogen
Nitrogen is the most essential element that helps in leaf and stem growth. Too little nitrogen leads the plant’s leaves to turn yellow. So use as much nitrogen as you can, especially during vegetation to make sure that the growth of the plant occurs in the finest way.
Phosphorous
Phosphorus plays a key role in the process of photosynthesis and respiration. It is advised to use more phosphorus than nitrogen during the flowering.
Potassium
Potassium is necessary for the building and transferring of sugars for marijuana plants. It is also an important element for absorption of water and nutrients, aiding rapid growth of the plant.
Watering of Marijuana Plants
Watering depends on the size of the plant’s container and the light’s intensity. HID lights due to the high level of heat given off affect the water level of plant. In general, you need to water your crop every other day. Roots want air as well as water, so a little bit of dryness is healthy for the plant—but not too much, otherwise the plant will suffer from dehydration. Water until about 20% of the water drains through the runoff hole at the bottom of the container. Then empty the runoff tray, rather than let the container sit in that water and reabsorb it.
Checking pH Levels
The pH level of marijuana plants needs to be monitored very carefully. 6.7 to 6.2 level is the best condition for the survival of your marijuana plant. Not paying attention to pH levels can lead to the devastation of the whole crop. Over feeding of fertilizers and organic compounds may cause disturbance in the pH level of a plant, so make sure to do your research before using any fertilizer. As far as fertilizers go, common manure fertilizer will do just fine for marijuana. You don’t really need to find some super extraordinary ultra-nutrient. So you are now almost done with the main guidelines about marijuana cultivation in soil. The only thing that remains is the level of lighting, which we will guide you through in detail later on, after we’ve talked about cloning…
Cloning Method for Growing Marijuana
Cloning is one of the smartest methods to grow marijuana and is widely used by farmers and indoor marijuana growers.
How Do You Clone?
Choose some donor plants, then take cuttings from them and grow the cuttings in a separate medium. You’re essentially creating mini-copies of the original plants. The big advantage is that each clone will turn out to be a female plant—i.e. the kind you’ll harvest hopefully giant buds from.
There are, however, some drawbacks as well to cloning, but if you already have some healthy and productive marijuana plants it’s a great way to produce more. You can easily select some donor plants from existing plants in your crop and then make some clones out of them. But let’s have a closer look at the benefits and drawbacks:
Benefits of Cloning
- It is a time saving process, because all you need to do is to select some plants, make the clones and place them in their growing mediums. In the seed method, it takes days in germination, growth of seedlings, and so on.
- It saves money as well, because you don’t need to buy any seeds.
- Your plants are guaranteed to be female.
- They grow much faster than seedlings, since they’re essentially already as mature as the plant the cutting was taken from.
- Rooted clones of marijuana take less time in flowering.
- Growing lots of marijuana at once becomes a much easier process, as clones take so much less time to grow.
- The characteristics of your final product will be the same or even better in taste, aroma and effects every time.
Drawbacks of Cloning
- Due to the genetic uniformity, there is more chance of plants succumbing to pests and diseases.
- Less variety. If you go with the seed process, you can grow something different every time—try different tastes, aromas and effects.
- Cloning can be workable and reliable if you are taking cuttings from your existing marijuana plants that you know well. Finding them from other sources and getting perfect results is far from guaranteed!
- If you choose a poor plant to clone from, you’re stuck with that plant’s flaws.
- They can easily die of shock if a little mishandling happens. QUICK TIP: Always take more clones than you need to allow for the inevitable.
- Clones are very sensitive, so are not that easy to handle at all.
- All the clones are always going to be females. Which makes breeding a problem in the future.
Step by Step Guide to Cloning Cannabis Plants
Below is the easy and step by step guide to making your clones:
Initial preparations
- The first and most important thing you need to do is to choose the mother plant. Remember that all the future product depends on it, so choose a healthy, productive and disease free mother plant.
- You should cut 50% more clones than the number of plants you need. Not all the clones are going to become healthy plants. Many of them may die from shock.
- You can cut the clones at any time during the plant’s cycle but supposedly the best time is before the plant starts flowering.
- Your hands must be washed with a good antibacterial soap; all your tools and growing area/medium must be clean too.
- For immediate planting, a pH balanced medium should be prepared.
- Keep all the clones nearby you within immediate reach at the time of their planting; exposed clones will wilt quickly.
How to take a cutting
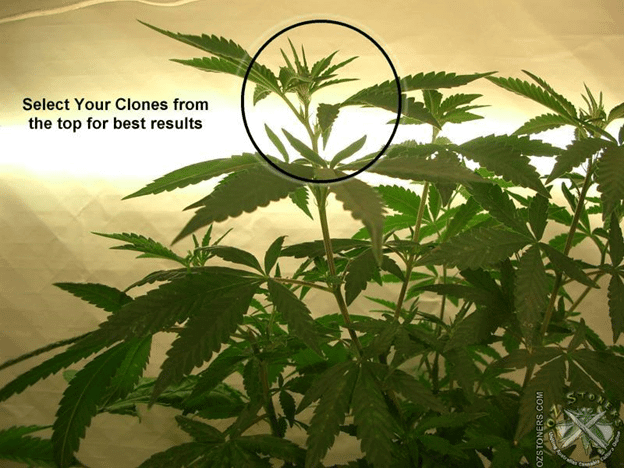
- Select the appropriate clones: actively growing plant tops, having two to three nodes/branches only with fan leaves (mature plants have alternating leaves, rather than facing ones). See photo below.
- Cut a lower node or two at the stem.

- Treat your clone in a good quality rooting solution, and make sure at least the lowest node is thinly covered.
- Now fix this clone in a rockwool cube.
- Do not forget to prep the rockwools by soaking them overnight in a pH balanced solution.
- Clip large leaves in half to ensure that the clone focuses on creating roots.
Growing clones into mature plants
- The next step is dome and lighting. Spray inside the humidity dome or propagator with No Damp solution (or equivalent). Do not spray the clone direct as it may result in powdery mildew.
- Place the covered clone tray with humidity dome at a spot where an appropriate amount of white fluorescent light is available. This light can be natural sunlight or T9 grow light, or even an HID light if you’re careful.
- The humidity dome should be removed from the clone tray on the 5th day. But remember also to lift the lid daily for air exchange.
- Water every other day. Then once a day when the dome has been removed.
- Now you have to check if the plant is rooted yet or not. For checking, you can tug the plant lightly toward upward side. If the plant is rooted, it will not come out of the cube. If it is not, it will come out of the cube easily. Please note that you are not supposed to do this until the 5th day. Rooting can take 5-10 days.
- If you see some leaves turning to yellow at this early stage, it is actually a good sign so don’t worry. It happens because during the process of rooting, the plant consumes all the nutrients from its fan leaves. Add a little weak nutrient at this stage.
- Till the time plant is in the process of rooting, you have to spray it with water. Once you have seen signs of plants being rooted, water them properly.
- You should also drain the rooting solution out from the cube as it is of no use now.
- Now, at this critical stage, you are supposed to check whether the plant is wilting. You can check it by opening the grow tent a little bit. If you find no wilting for 4 to 6 hours it means you are ready to move ahead.
- Now you can put these clones under HID or LED lights or you can plant them outdoors in soil.
- Make sure that they get 15 to 18 hours of lighting. They need this much light to get to the vegetation phase.
How To Avoid Wilting When Growing Clones
Don’t worry if you find your clones wilting, just check if they are placed properly in their respective mediums. Also keep a close eye on your lighting. It should not be too bright and should be in line with the light levels needed by the plant. New clones need relatively gentle light: 25/45/45 (red/blue/white percentage settings for a Kind LED grow light). If you follow the above criteria, you should get successful results. And over time and with experience you’ll be able to refine the process and learn even more.
Hydroponics
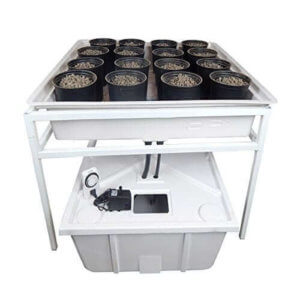
Hydroponics for growing marijuana results in the greatest yields. But it has both advantages and disadvantage, so let’s discuss them first before going into the core details of how you can grow your own Cannabis Sativa using hydroponics.
Advantages
- There is no need for soil in this method so it is a clean process. All the process is done making no mess at all.
- Due to the controlled system, pollution in the environment is eliminated.
- It produces large amounts of high quality weed.
- Due to the controlled and monitored system of hydroponics, there should be no dry spots or root drowning.
- It reduces water costs because water remains in the system.
- Nutrients are controlled under the system, so it save you money here as well.
- It is easier to prevent the hydroponic system from getting infected or attacked by insects.
- The time of growth is rapid and quantity of yield is greater.
- With the right hydroponic system you can even grow your own weed in your bedroom.
Drawbacks
- This is an expensive mean of growing marijuana.
- You need to regularly monitor on the system.
- It totally depends on electricity.
- A little mistake can destroy the whole thing that took you ages to prepare.
Step By Step Guide to Growing Marijuana Hydroponically
Now let’s show you how to grow marijuana in your hydroponics system. Make sure to follow each step correctly and in the right order.
Initial preparations
- First of all collect all the basic necessary items that you need. The items may include seeds or clones (whatever you prefer); some white paint; hydroponic nutrients; containers or pots; growing medium for the pots (such as Coco Coir); fluorescent, HID or LED lighting system; timer; pH detector.
- Now you’ll need to prepare your walls in order to maximize your weed production. Growing indoors, means it’s up to you to provide your crop with an appropriate amount of light. Painting the walls of your grow room with semi-gloss white paint helps reflect the light source back onto the plants.
- You can also use mylar to line your walls, or grow within a mylar-lined grow tent or grow box, as mylar is highly reflective. The drawback is that mylar reflects both light and heat extremely efficiently, so you need to be careful not to burn your plants.
Lighting
- Next you have to set up the lights. Hang them to give your plants the maximum amount of coverage. Your light should come with instructions giving suggested heights for each stage of growth to ensure each plant in your grow space gets enough light. Also check any instructions that came with your plant or seeds, as some strais need more light than others.
- If you're using HID (High Intensity Discharge) grow lights, the general rule of thumb is 40w per square foot, going up to 60-70w to maximize yields.
- If you're using LED grow lights, to ensure good coverage, check your light's PAR value. PAR (Photosynthetically Active Radiation) is the section of the light spectrum that the plant can actually absorb and use to photosynthesise. This is the range from 400nm to 700nm. A full cycle LED light will produce the PAR values you need at every stage of your grow—and won't waste your electricity bill producing light your plants can't use.
- PPFD, Photosynthetic Photon Flux Density, is the main measure of how much of that usable light is falling on the plant per square meter per second. It's basically the intensity of the light. This is often what people mean when talking about PAR rating or values. For good light coverage, the higher the better.
- When buying an LED grow lights, as well as looking out for high PAR values, you also need to check out the spectrum it produces. This is basically the quality of that light. The ideal is a full spectrum grow light.
- The simplest rule of thumb for making sure your plants are adequately covered by an LED grow light is to assume a minimum of 32w per square foot. However, note that this refers to how many watts the light draws at the wall socket, not its stated output.
[N.B. We could go a lot more in-depth on ensuring even light distribution, PAR and the various measures and ratings involved with grow lights. It's a large and sometimes controversial topic in the growing community. However, for this beginner's guide we decided to stick with the simplest rules of thumb, to get you growing more quickly. And as we mentioned above, the instructions that came with your light and seeds/plant should see you right. However, if you want to learn more, check out this article or our guide to choosing a grow light.]
Temperature, humidity, ventilation, nutrients
- Careful not to overheat plants with the lighting. The maximum temperature a marijuana plant can bear is about 90 degrees Fahrenheit. Check this guide for how to measure and control temperature and humidity in your grow setup.
- Every plant needs proper ventilation. This is one of the most important requirements for an ideal growing environment. So make sure that your growing area is properly ventilated.
- If you are not using the cloning method, then you’ll obviously need seeds. Seeds need to germinate before planting. (We've covered how to pick seeds and germinate them above.)
- The next destination for a germinated seed is a rockwool block. This is where the initial growth of the plant will take place.
- Now you can start feeding your plant with water and other nutrients in your hydroponic system. The ideal water pH level at this stage is 5.0 to 6.0. Do not overfeed the plant with some extraordinary amount of nutrients—too many nutes can spoil a plant very quickly. Start off with an average amount of nutrients and increase gradually.
- At this stage, a plant needs intense care and careful monitoring to ensure maximum yield in the future. Keep an eye on the pH level of the tap or filtered water you are growing with. Also keep a careful eye on nutrients and lighting. As plants grow they obviously get closer to the light, so be careful they’re not getting too much.
Vegetation and flowering
- After seeding, the next important phases in a plant’s life are vegetation and flowering. You need to make sure that the environmental conditions are perfect for these stages to maximize your yield and yield quality.
- You can use height to determine the growth time for your plants in the vegetative phase. The plant may double its height during the phase of flowering. Ideally the plant should be left in a vegetative stage till its height is 6 to 18’’.
- Once your plant has grown up to 18’’, it’s time to start the flowering process. Balance of lighting has a vital role at the flowering phase. Adjust the light schedule to provide 12 hours of light a day.
- As plants begin to flower, within the first couple of weeks you’ll be able to judge the sex of the plant.
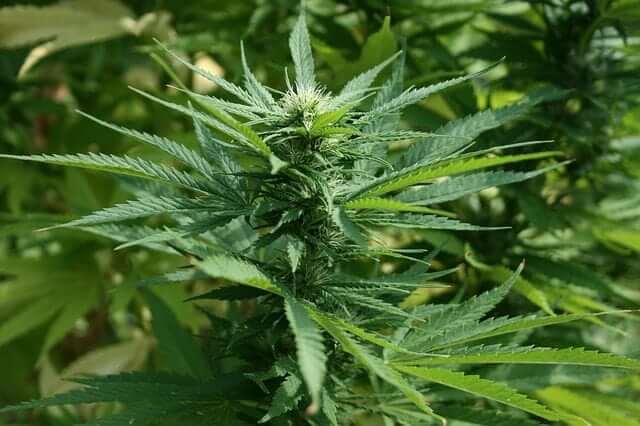
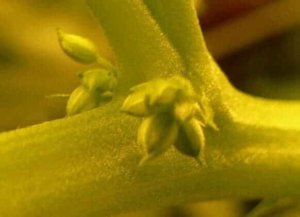
- Female plants will start growing white hairs around the nodes/branches, these will turn into white wispy almost shoot-like ‘pistils’.
- Whereas in male plants, after a week or two, small grape-like balls will become visible, which will grow into bunches (pollen sacs). These bunches may also resemble bananas, in shape and color. (So, yes, balls and a phallic shape. If that helps you remember.)
- Check, too, for hermaphrodite plants. Sometimes a plant will develop female pre-flowers on one part and male on another. So continue to keep an eye on plants that you thought were female, and don’t just judge on one preflower.
Female plant.
Male plant.
- Remove all the male plants now as they will pollinate females. Also remove hermaphrodite plants that will self-pollinate and may pollinate other plants too.
- Continue to keep an eye on flowers as a stressed female plant can begin to grow elongated yellow pollen sacs from the center of the bud. These ‘bananas’ produce pollen as soon as they emerge. Remove or separate them immediately, and if you see too many ‘nanners’, begin harvesting and cut your losses.
- Now comes the most patience demanding phase, as you wait for a plant to reach maturity. How long this takes totally depends on your system and the type of strain you're growing. As a general estimate, it takes about 6 to 12 weeks for Cannabis Sativa to mature.
Harvesting
- One week before harvesting, only feed the plant with water. If you use other nutrients at this time, they can affect the taste when smoking your weed.
- Harvest when resin on the buds is clear and sticky, some of it beginning to darken to brown or amber.
- For greater control over flavor and effects:
- When you see 50 to 75% of pistils have turned red/brown, you'll get a lighter flavor and mellower high.
- When 70 to 90% are brown you’ll get heavier stronger weed.
- 90 to 100% and it’s very nearly too late, the taste will be heavy and the effects more narcotic.
- Other signs that it’s harvesting time: the stem will start to broaden, leaves will start to yellow and die back.
- You can also look closely at the trichomes (the hairs on the buds). If the trichomes are clear, keep waiting. If they’re a milky white, some becoming amber, they’re ready. And if they’re all amber, you've waited too long—your weed may have a very strong, possibly unpleasant flavor and active ingredients will have started to deteriorate. Use a magnifying device to check.
- Or you can just judge and plan ahead by time. Generally harvest Indica after 8 weeks of flowering, Sativa after 12 weeks (10 for some strains), and autoflowering strains after 10 weeks total from seedling to bud. But always check the likely flowering phase length for the particular strain you’re growing.
How Important Is Light for Marijuana Growing?

Marijuana requires a lot of light. This is the key factor in producing greater yields. The crop will not be sustainable if an appropriate amount and type of lighting is not provided. Whether you are growing cannabis in soil medium or in a hydroponic system, correct lighting is probably the most needed nutrient for healthy plant growth.
Lighting Systems
When it comes to lighting systems for indoor growing, there’s an almost overwhelming amount of choice available these days. And of course each option has its respective advantages and disadvantages—which we’ll cover shortly. Lighting systems can include bulbs, reflectors, ballast, timers, different color spectrums and various other features. But whatever the system, the intention is to activate rapid growth in your cannabis plants and maximize your yield.
Important Information About the Role of Light
What you need to determine before choosing the lighting system is the color and temperature of light. Different colors have different impacts. Look at CCT/Kelvin rating to determine color of HID fluorescent lights and CRI rating to gauge the intensity of the color. The higher the CRI the more natural and vibrant the stated colors will appear. For Kelvins, 2700K will be a warm red, 4200K a cooler blue color, 6500K is closest to sunlight; the lowest Kelvin rating is white, the higher the number the bluer the color. You will find varying advice on wattage of lights, with the maximum used by most growers being 1000W for the cultivation of Cannabis Sativa. More than 1000W will usually be harmful, but setups with lower wattages can work well. (However, when it comes to LED grow lights, you'll find some much higher wattage LED models on the market. Because one of the great advantages of LEDs is that they run so much cooler than other grow lights.) A simple way to gauge light emitted per square foot by a non-LED bulb or any other non-LED light source: look at a light or bulb’s lumens rating. A marijuana crop needs luminosity of at least 3000 lumens per square foot. Although, for maximum productivity, you should provide 7000 to 10,000 lumens per square foot. A broader color spectrum lamp will tend to outperform a grow lamp with a higher lumen output. They need bright light, but it’s the blue and red parts in particular of the visible light spectrum that plants actually absorb and use to photosynthesize. Having said all that, though... we want to reiterate the importance of PAR values. 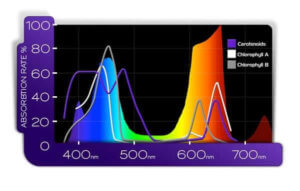
PAR spectrum emitted by a full spectrum LED grow light.
Lumens really only measure the intensity of the light to the human eye. For plants, which can only use wavelengths within the 400-700nm range of the light spectrum, it's PAR that really matters, and the spectrum of light produced. Various kinds of bulbs can produce a broad spectrum of usable light for growing cannabis. Or you can have different lights for different stages of the growing cycle. But a good LED grow light is the simplest option. It will give you every kind of light the plant needs (and none that it can't use), more efficiently, cheaply and with more user-friendly controls. However, a lot of available growing advice (especially for non-LED grow lights) still discusses lumens. Hence the discussion above.
Sources of Light
Growing a crop indoors you’ll obviously need some artificial light source—and you simply cannot afford to ignore good lighting if you are a serious grower and want results. Fluorescent and especially LED grow lights are great for the growth of marijuana plants. Compact fluorescent lights are also available on the market, commonly abbreviated to CFL. The best thing about CFLs is that they are available almost everywhere. HID lights may not be available in some places, but CFL is available pretty much anywhere in the world. Early LED lighting systems were not ideal, but the technology and costs improved rapidly and LED lights are now highly regarded for indoor growing of plants. As we said above, they're by far the simplest option and increasingly the best option too—especially for a beginner. There are numerous benefits to using LED grow lights, but the one most worth mentioning here is that they produce full spectrum light with a low level of heat.
Placement of Light
The ideal distance of light from your plants totally depends on the type of source you’re using. If you are using heat emitting grow lights then you’ll need to place this type of light a bit higher above the plant. Check the light's instructions. However, if you’re using something cooler like LED grow lights, hang them about 10 to 14 inches from the plant.
Lighting Schedules for Different Stages of Marijuana Plant Growth
During the plant’s different phases, Cannabis Sativa requires different schedules and hours of lighting.- In the seedling phase, Marijuana needs 16 to 18 hours of proper lighting.
- In the vegetative stage, the requirement increases to 18 to 24 hours daily.
- In the flowering phase, give the plants 12 hours of light and increase the red part of the spectrum.
Remember that lighting plays the main role in nourishment of your marijuana crop. If lighting is not good enough, your harvest won’t be either.
Harvesting of marijuana

Let’s get one thing out of the way, harvesting marijuana doesn't demand some sort of rocket science. Harvesting is actually a fun thing. It's the reward for all the hard work you've put into all the growing phases of your crop. Here’s what you need to know to get it right…
When Should I Harvest My Marijuana Crop?
Let’s cut straight to the chase. The right time to harvest the marijuana is easy. In fact, we've already covered it above. Just look at the color of the pistils or hairs covering the buds. At the beginning of flowering they’re white, but when they’re ready for harvesting they start to turn dark brown. When around 70% have turned brown is a good time to get your harvesting tools ready. After that, it all depends how you like your weed to taste and the effects you’re after. The browner, the stronger heavier and more narcotic.
How Do I Harvest My Marijuana Flowers?
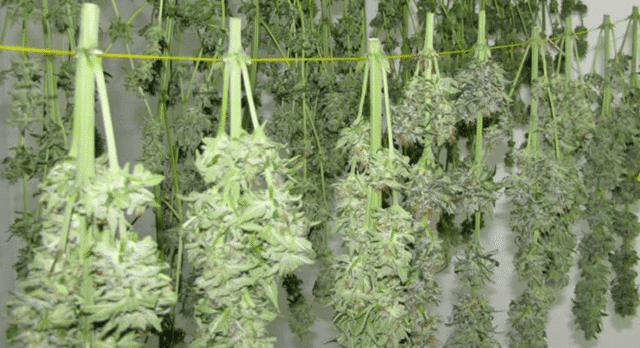
On the day you decide to harvest your marijuana, it’s a good idea to start off early in the morning. Harvesting isn't difficult but can certainly be time-consuming work—especially if there’s plenty to harvest. You should start by cutting the plant wholly from its root. Cut all of the plants that you nourished in your grow area. To make things easier, begin by cutting the larger, heavier plants first. After cutting them, remove some of the larger fan leaves. Then hang some wire horizontally from the ceiling and hang the cut plants from it, upside down, keeping some space between plants for good air circulation. Once you’re done with that, it’s time to dry your plants. The cheap, economical and most reliable way to dry the plants is to leave them in open air. However, drying cabinets and automated curing machines are also available on the markets these days and can be very helpful in drying your cannabis quickly and efficiently. The latter are more for commercial growers though. Some people also use oscillating fans to improve ventilation when drying. The fans should be circulating air around the plants, not blowing directly on them. If your plants are moving, your fans are not positioned correctly.
What Time of Day Should I Harvest My Weed?
Time of day is important in the harvesting of cannabis. Ideally, harvest in the dark. Because at night, the female plants store the food which they prepared during the daylight by photosynthesis. However, that’s for outdoor growing. For indoor growing, night time is dependent on your plant’s lighting schedule. If lighting was scheduled during night hours, for instance, then harvest the product in the morning. Since it can be time-consuming work, check how many plants you have, estimate how long it’s going to take to cut them all, and make sure you've set aside enough free time to get it all done.
How Do I Prepare my Weed for Smoking?
The first thing to note is that plants don’t die when you cut them, they die when their water is dried out. So, before doing anything else to your harvest, you need to leave the plants for at least 7 days in an environment of around 70 degrees Fahrenheit and 50 percent humidity to dry the remaining water from the plant. Keep the room dark too. And check periodically that no mold or mildew is developing. Remove any affected parts immediately. A fan to increase air circulation will help to prevent this.
A quick note of caution:
During the first few days of drying, the plants will give off a strong, unmistakable scent of marijuana! But don’t be tempted to hurry things along. Drying is not a process to rush—it can take up to two weeks. Sometimes a few days longer. However, drying slowly ensures heavy, flavorful, aromatic buds. After drying, the final step to producing tasty, smokeable weed is curing proper (technically, the whole drying process from the moment the plants are cut is curing). When the twigs inside your buds become brittle and the outside of the bud feels dry to the touch, you’re ready to begin. The buds should just snap off, with no stringiness left behind. Ideally, larger stems should still bend. Some growers, however, like to trim the buds before curing. If you do so, use clean sharp scissors to trim away any remaining leaves. (But save them for making edibles, as they will still contain trichomes.) And if you have more than a couple of plants, a good bud trimming machine can save you a lot of time and hard work.
What is Curing and Why is it Necessary?
Curing is done to make sure certain natural plant processes occur that will ensure peak potency and quality. It gives you a smoother, more flavorful smoke. Here’s what curing does for your dried buds in more detail:- Breaks down chlorophyll to improve taste and smoothness of buds.
- Brings out the unique flavor mix and aroma of your chosen cannabis strain.
- During curing and drying turns all the THC in fresh marijuana into psychoactive elements that make you high when smoking it.
- Reduces “harshness”, so that you’re less likely to cough or get a headache.
- Properly cured buds are less likely to cause negative side-effects such as anxiety and paranoia.
- Lessens the risk of mold or bacteria growing on your buds.
- Increases potency, according to many.
As a first-time grower you might be eager to try the fruits of your labor ASAP. But as you can see, it’s worth waiting—good curing accounts for almost 50% of the quality of your final product!
How Do I Cure My Marijuana?
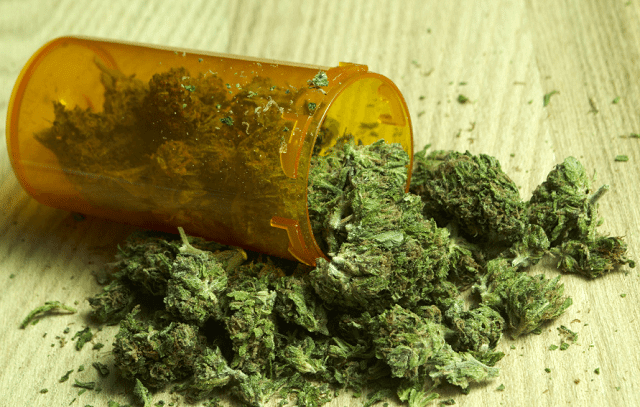
Simply put the dried buds in mason jars (ideally 1 quart jars, which will hold about an ounce), about 75% full. Any that don’t feel dry to the touch, keep drying them. If buds already in a jar start to stick together when you shake the jar, they may still be too moist. Just leave the lid off for a while until they feel dry to the touch again.If you choose to invest in a hygrometer to test humidity in the jars, you’re aiming to keep your buds at a relative humidity of around 60-65%. Also, keep your jars in a cool dark environment. For the first 1-2 weeks remove lids and check your buds every 24 hours—they need air. If you smell ammonia or feel moistness, leave the jar open to air for 2-4 hours. If buds feel wet, remove them entirely for 12-24 hours. Don’t worry too much about over-drying. It’s best avoided, but even over-drying improves the cannabis. After a couple of weeks, when you’re sure that the buds are curing nicely, you can start to remove the lid just once a week. If all remains well for several weeks, once a month will do. Buds will continue to cure for up to 6 months. For long term storage, keep in an airtight container (such as the mason jar). Buds should have been curing for at least 3 months first. After 6 months, consider vacuum sealing them, or freezing the buds in tightly packed mason jars.
How long before you can smoke it?
Up to you. You can try a little at any stage in the curing or storage process and see what ‘vintage’ suits you best. That’s it—you’re done! You've got your first smokeable crop of marijuana.
Afterword
In writing this step by step guide to growing weed indoors we wanted to help out newbie growers, many of whom can get confused by or bogged down in lengthy and overly-technical books. That’s not to say the information in those books is wrong, by any means—in fact, we gathered plenty of information for this article from those books. The problem we found with those books was that they just weren't aimed at the newbie. Too much jargon. Too easy to get lost in advanced techniques you don’t need to know until you've tried growing a few times. We decided there needed to be an accessible guide for the beginner which focused purely on all the most useful starter information about marijuana and marijuana growing methods and gathered it all together in a concise, convenient manner. This guide will get you started. The rest you can learn along the way as you step up your growing, encounter new problems and solutions and hone your techniques. We hope that you’ll benefit from our efforts and that you enjoyed this beginner’s guide to growing marijuana indoors. We look forward to hearing from you through your feedback. And we wish you the best of luck in your budding weed growing career. Happy growing!
Next Level Weed Growing
Made it through our beginner's guide and starting to get the hang of this whole weed growing thing? Looking to step up your marijuana growing game to pro level? You couldn't do much better than to invest $57.00 in a copy of Ryan Riley's 839-page Growing Elite Marijuana: The Complete Guide—revised and updated for 2017.

The Encyclopedic Grower's Guide
We know, 57 bucks looks pricey at first glance. But when you're really getting serious about growing, a comprehensive grower's bible like this could swiftly pay for itself many times over in better quality weed, higher yields, and fewer costly mistakes—and save you a lot of time-consuming trial and error into the bargain. Moreover, it's not just one monster book you'll get—it comes with a whole package of invaluable guides, including an audio version. If you think you might want to buy this book, go the page and skip almost all the way down to the bottom to avoid the incredibly long sales pitch. You will find the order form and the details for everything else at the bottom of the page. In short, this is all the most up-to-date professional knowledge you could ever need to take your marijuana growing to the next level—and have you literally living the life of Riley! (Sorry. We couldn't resist.)
See reviews of LED Grow Lights on 420Beginner.com.